TABLE OF CONTENTS
SECTION ONE / Globe Master Overview
GENERAL DESCRIPTION
FRONT VIEW
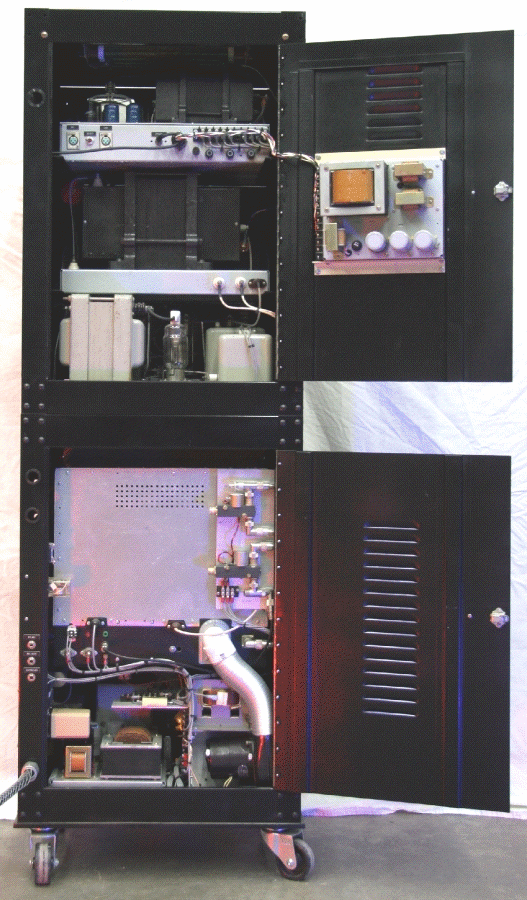
REAR VIEW
SECTION TWO / Description of Controls
2-1 304TL MODULATOR DECK
2-2 4-1000A METERING AND CONTROLS DECK
2-3 4-1000A RF DECK
2-4 MAIN POWER PANEL DECK
2-5 304TL MODULTOR / Rear Panel Connections
2-6 4-1000A / Rear Panel Connections
SECTION THREE / Power Supplies and Protection Circuits
3-1 GENERAL DESCRIPTION
3-2 BRIEF DESCRIPTION OF EACH POWER SUPPLY
3-3 DESIRED GOALS
3-4 4-1000A POWER SUPPLY / Theory of Operation
3-5 LOW VOLTAGE START-UP AND RELAY SEQUENCING-Schematic
3-6 LOW VOLTAGE START-UP AND RELAY SEQUENCING-Description
3-7 4-1000A VARIABLE OUTPUT POWER PLATE AND SCREEN SUPPLY-Description
3-6 4-1000A PLATE TRANSFORMER HIGH VOLTAGE RECTIFIERS, FILTERING AND CURRENT LIMITING
3-7 HV COMPONENT REAR VIEW
3-8 HV COMPONENT FRONT VIEW
3-9 4-1000A PLATE SUPPLY DC SUPPLY SCHEMATIC
3-10 4-1000A SCREEN GRID DC SUPPLY SCHEMATIC
3-11 4-1000A CONTROL GRID BIAS SUPPLY
3-12 GRID BIAS CONTROL DESCRIPTION
SECTION FOUR / 4-1000A RF deck
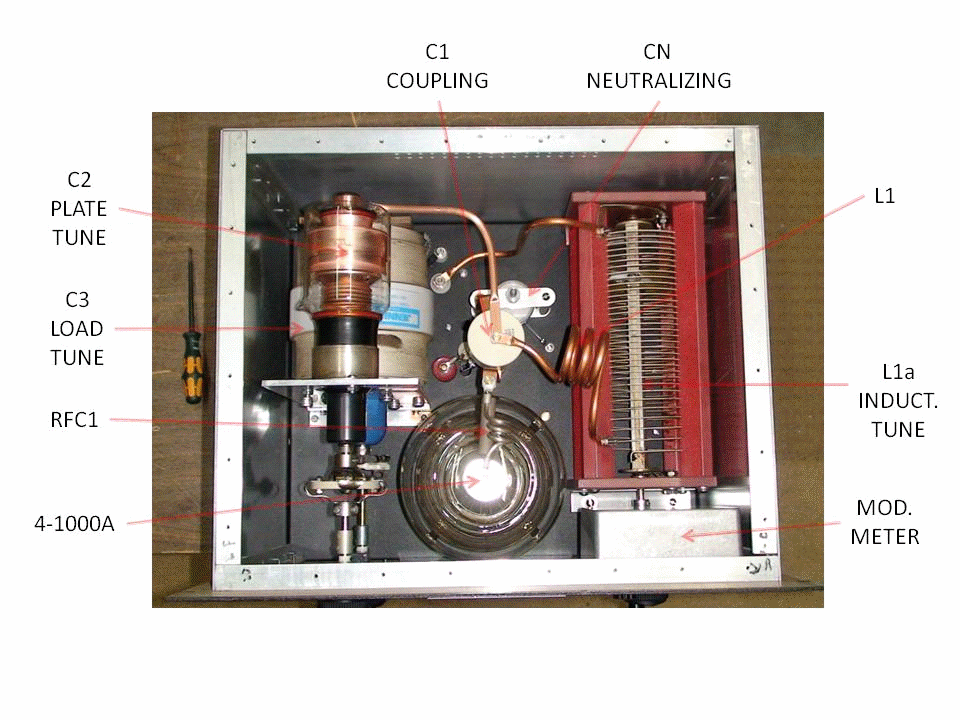
4-1 RF DECK TOP VIEW
4-2 RF DECK BOTTOM VIEW
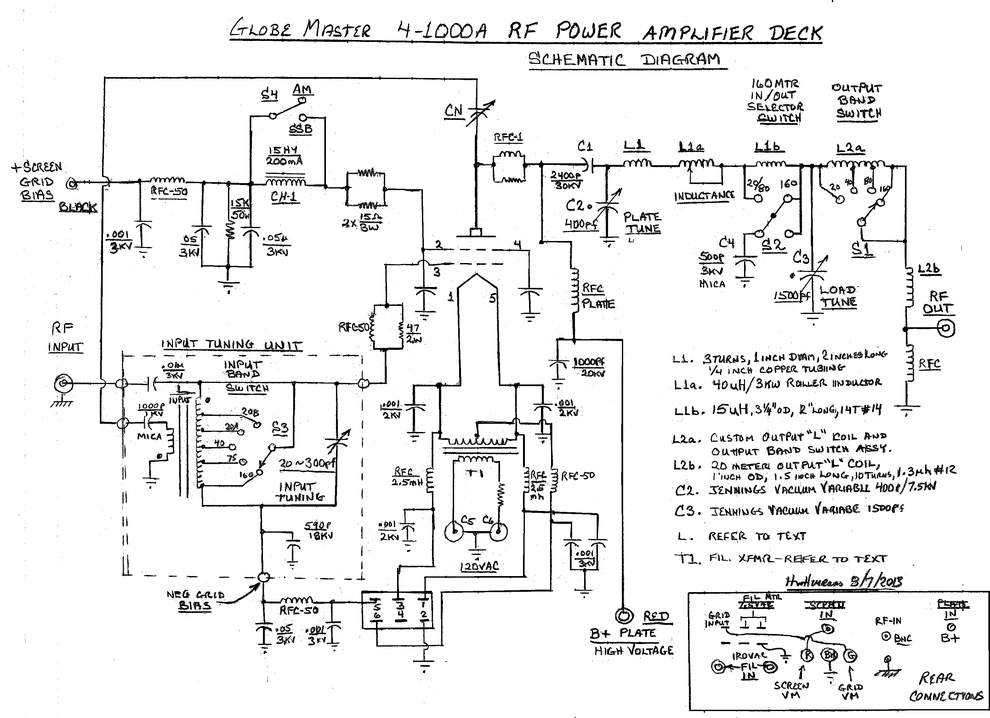
4-3 RF DECK SCHEMATIC DIAGRAM
4-4 INPUT TUNING UNIT-SCHEMATIC AND WIRING DIAGRAM
4-5 RF DECK CIRCUIT DESCRIPTION
4-6 CONTROL GRID INPUT CIRCUIT
4-7 SCREEN GRID CIRCUIT
4-8 SCREEN MODULATION CHOKE
4-9 Pi-L OUTPUT NETWORK
SECTION FIVE / 304TL MODULATOR
5-1 DESCRIPTION
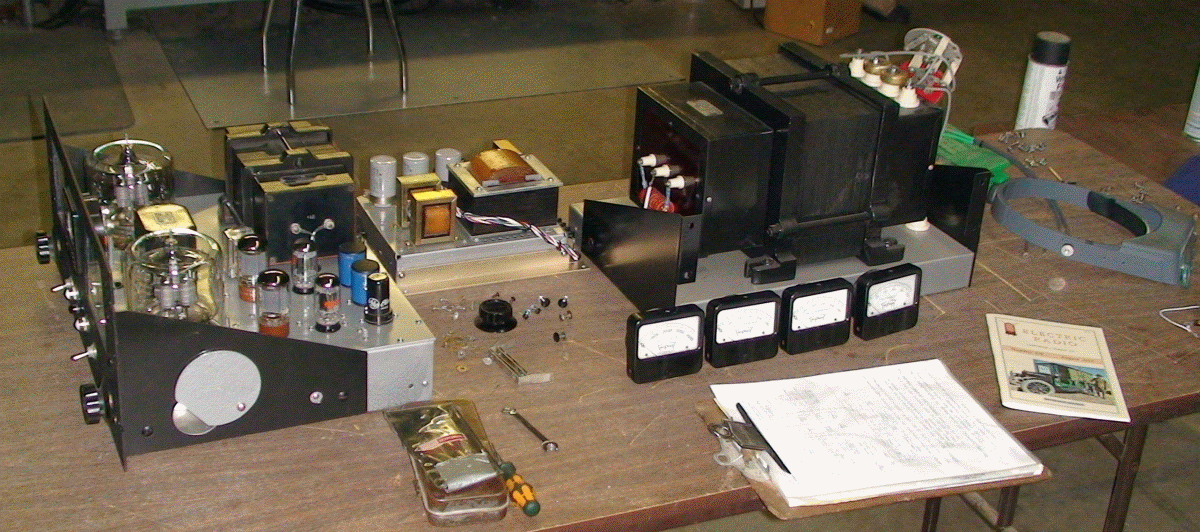
5-2 FRONT VIEW
5-3 TOP VIEW
5-4 BOTTOM VIEW
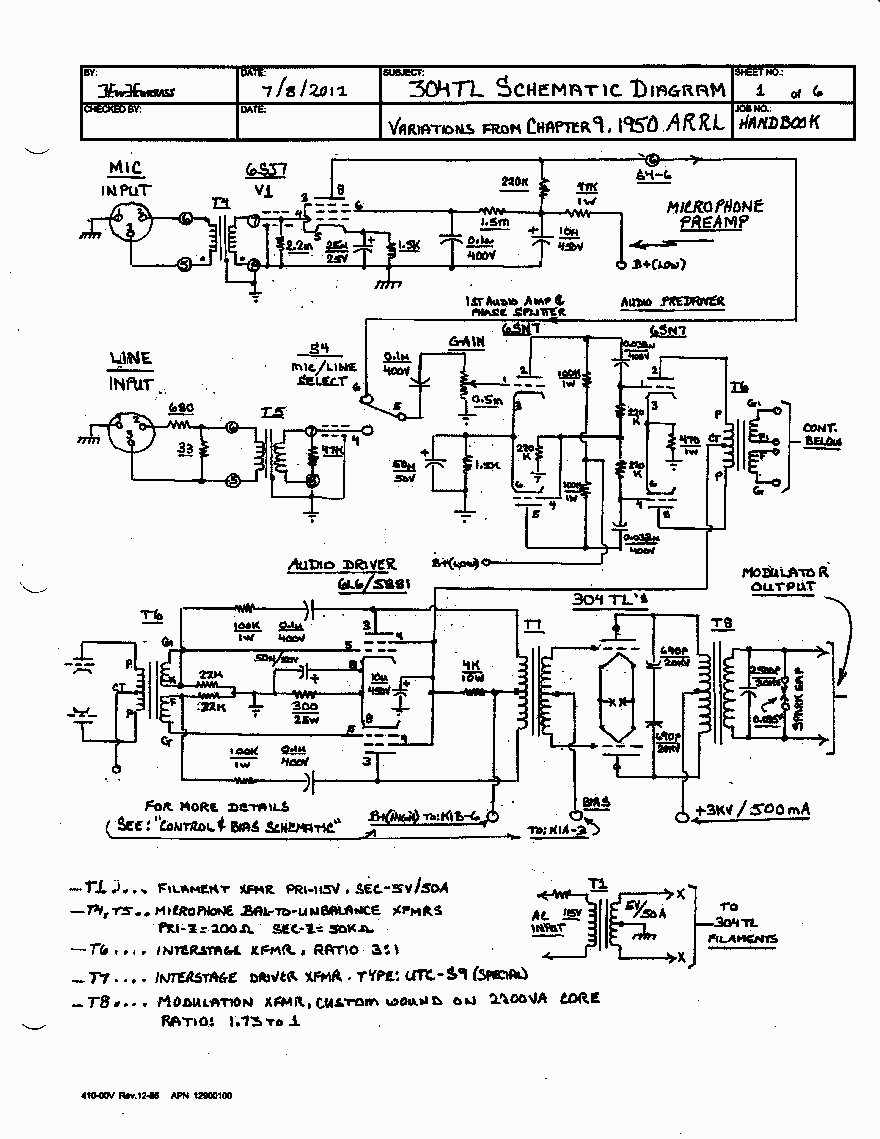
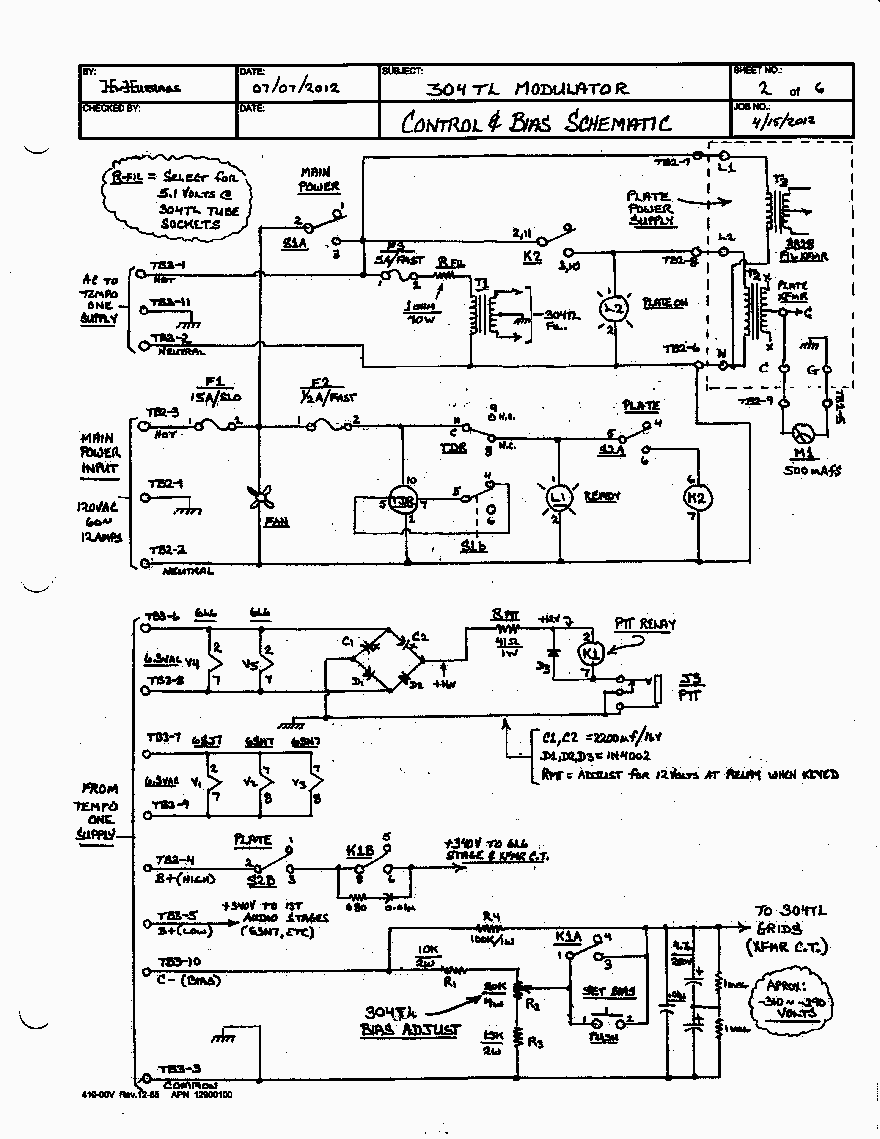
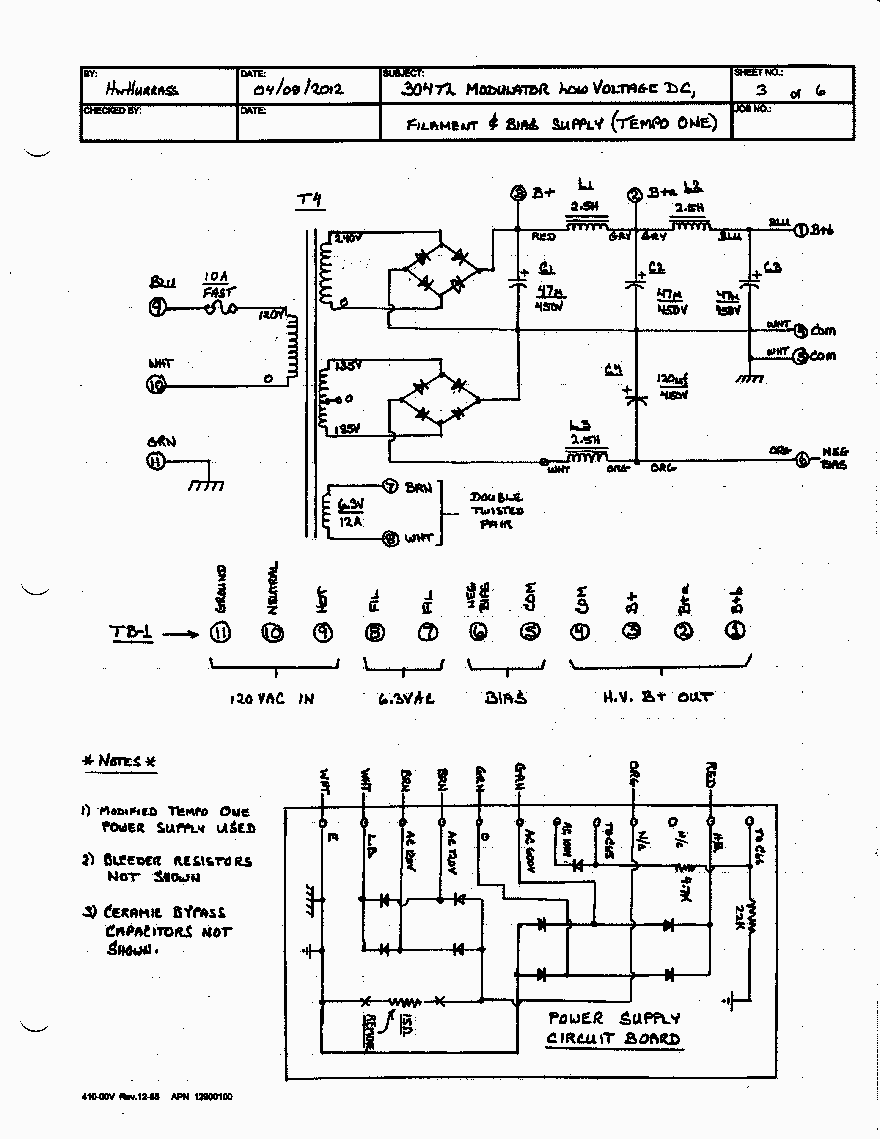
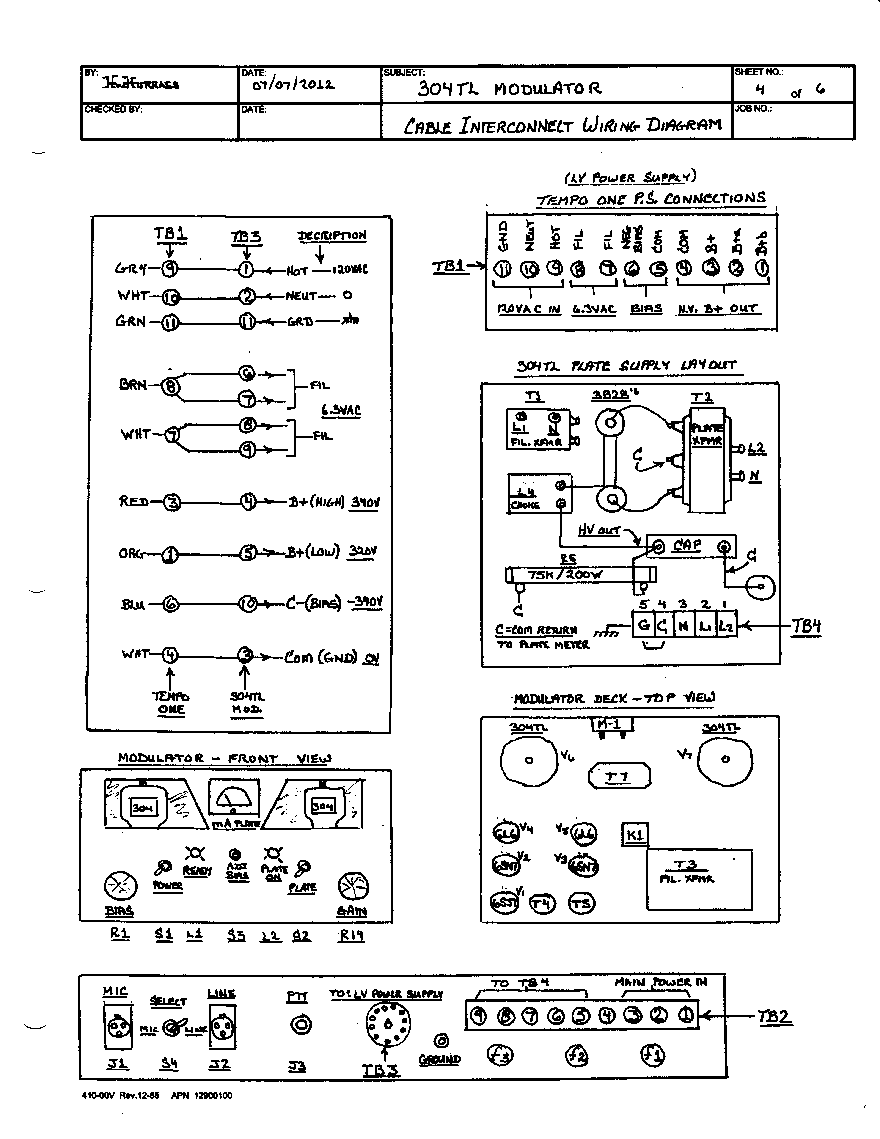
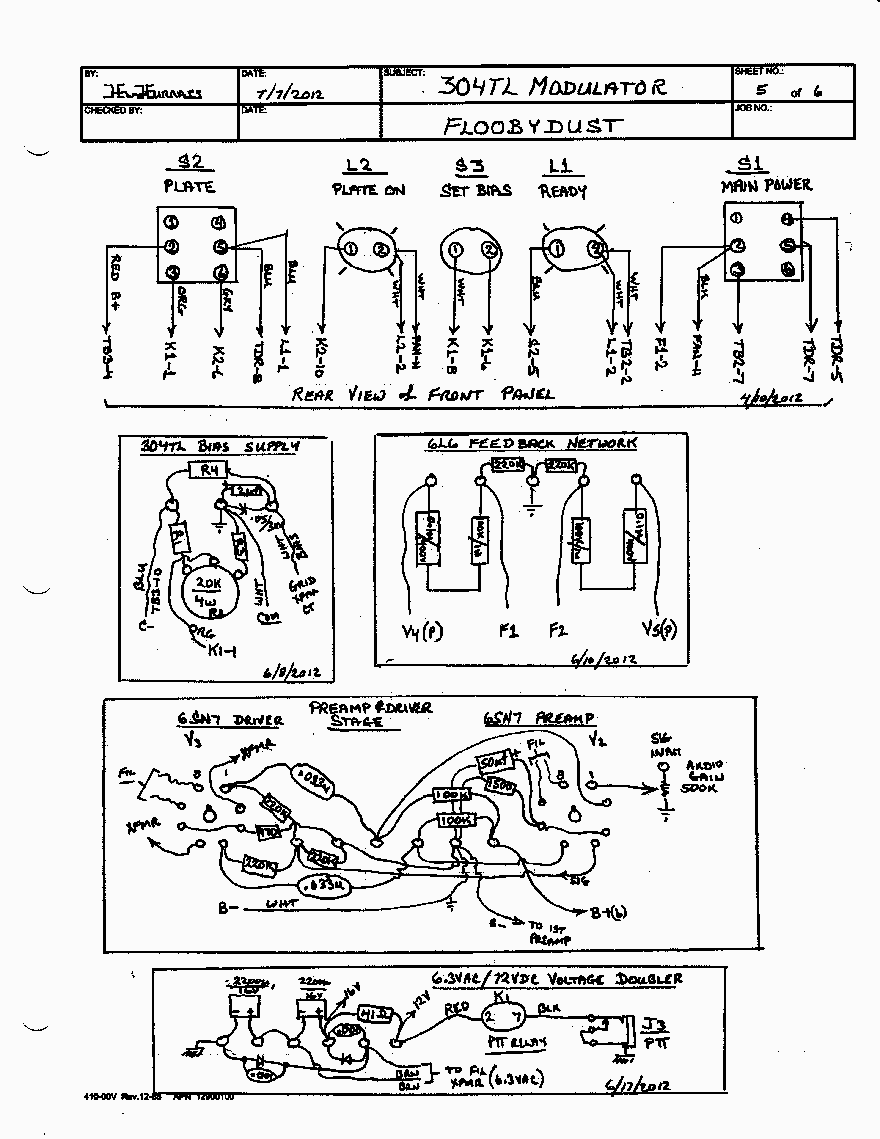
5-5 SCHEMATICS AND WIRING DIAGRAMS
SECTION SIX / TUNING AND OPERATING PROCEEDURE
6-1 HIGH LEVEL AMPLITUDE MODULATED MODE
6-2 LOW LEVEL AMPLITUDE MODULATED MODE
6-3 SINGLE SIDE BAND (SSB) MODE
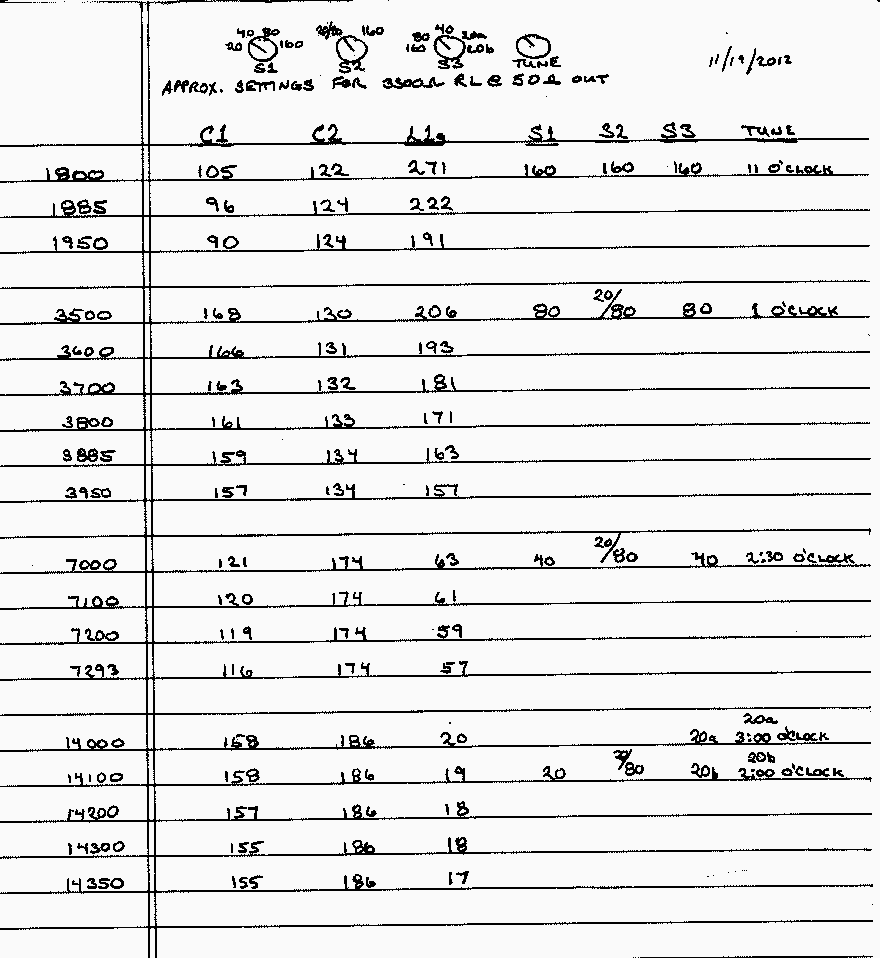
6-4 RF DECK TUNING CHART
SECTION SEVEN / HOMEBREW MICROWAVE OVEN PLATE CHOKE
7-1 DESCRIPTION
7-2 PHOTOS
SECTION EIGHT / ACKNOWLEDGEMENTS
SECTION NINE / REVISIONS-NOTES-ADDITIONAL INFORMATION
9-1 AUDIO INPUT ATTENUATION
9-2 MODULATION MONITOR
9-3 DIGITAL METERS
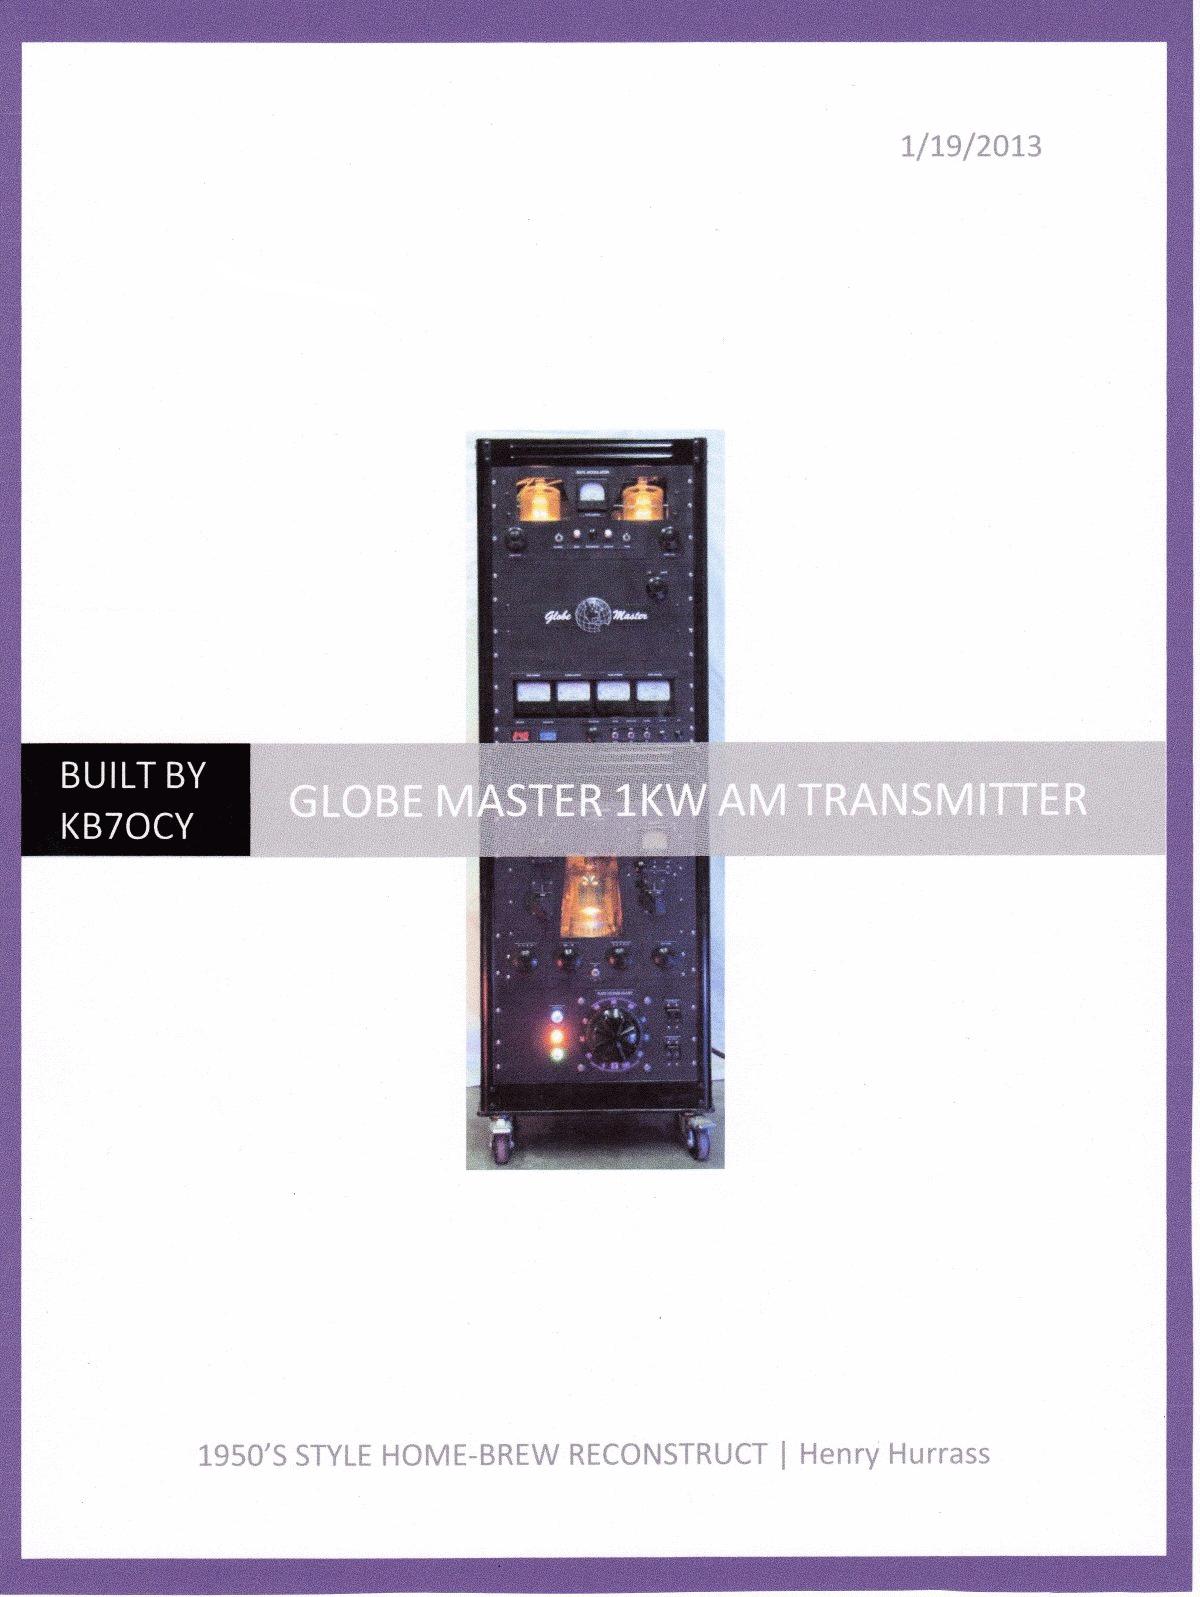
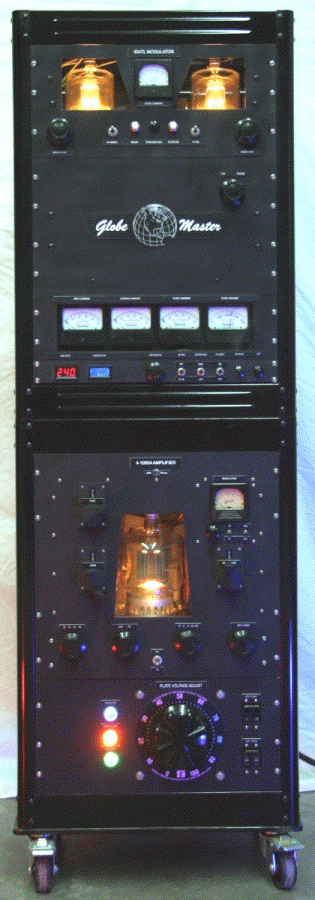
SECTION ONE
Globe Master
“IF YOU DARE DREAM IT, BUILD IT!”
ONE KILOWATT AM TRANSMITTER
GENERAL DESCRIPTION
The Globe Master is a high level plate modulated AM transmitter easily capable of producing one-hundred percent modulation at the full legal power limit on 20/40/80 & 160 meter amateur bands with only 10 to 15 watts of drive provided from an external exciter.
The builder’s desire from concept to finish was to replicate the 1950’s era look and feel of an amateur radio transmitter which would command the airwaves with the push of a button, yet be easy and pleasurable to operate. Attention to necessary and desirable features without excessive clutter was a priority.
Built into a handsomely styled double-stacked 60 inch tall rack are the following component racks from top to bottom:
304TL AUDIO PREAMP AND MODULATOR
MODULATION TRANSFORMER
4-1000A RF DECK FULL COMPLIMENTARY DC METERING RACK
AC LINE VOLTAGE, CABINET TEMPERATURE, GRID BIAS ADJUST and RF PLATE ON/OFF
4-1000A RF POWER AMPLIFIER DECK
AC LINE CIRCUIT BREAKERS, RF PLATE VOLTAGE ADJUST and INDICATOR LAMPS
A prerequisite for construction was that all controls be clearly marked for easy identification and placed in a well thought out fashion so as to provide the least amount of distraction to the operator.
Another important requirement was that the 304TL and 4-1000A power vacuum tubes be in full view from the front panel for the enjoyment of operating personnel and visitors alike.
To reduce wiring clutter, all cables are rear-connected and/or accessed from the rear doors.
Additionally, the RF portion of the transmitter may be used as a high quality stand-alone SSB Linear Amplifier by merely placing the 4-1000A screen selector mode switch (located on the RF deck) from AM to SSB and changing the modulation transformer output control switch from PHONE to CW position. The modulator power may be left “OFF” for SSB operation. More information is provided in the “Operating the Globe Master on SSB / Low Level AM” section.
The modulator layout was carefully designed to produce a very clean on the air hi-fi signal.
SECTION TWO
GENERAL DESCRIPTION OF CONTROLS
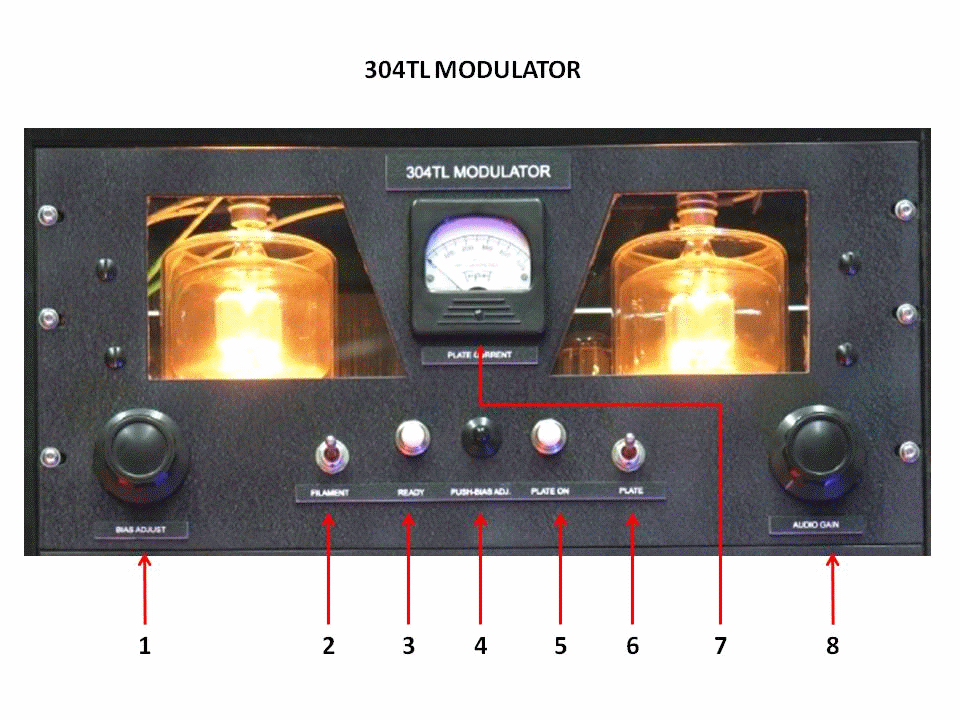
(1) BIAS ADJUST Allows convenient front panel adjustment of the 304TL’s negative grid voltage; normally set at approximately 140mA plate current with no audio signal applied.
(2) FILAMENT Energizes all filaments, HV power supply rectifier filaments, LV power supply and plate supply time delay relay.
(3) READY Indicator lamp illuminates after an approximate one minute time delay for proper warm-up of the HV plate power supply rectifier tubes.
(4) PUSH-BIAS ADJ. Allows checking for proper idle bias current without having to key the transmitter.
(5) PLATE ON Visual indication that high voltage plate supply is energized.
(6) PLATE Energizes high voltage plate supply.
(7) METER Indicates 304TL plate current.
(8) AUDIO GAIN Adjusts audio input level (both MIC and LINE)
(9) CW / PHONE This switch shorts the output of the modulation transformer when placed in the CW position. WARNING: THIS SWITCH SHALL BE PLACED IN THE PHONE POSITION ANYTIME THE MODULATOR IS IN SERVICE. FAILURE TO DO SO COULD SERIOUSLY DAMAGE THE MODULATOR. The switch may be placed in the CW position when the RF amplifier is used as a SSB Linear Amplifier, in which case the modulator is switched off. See SSB OPERATION section for details.
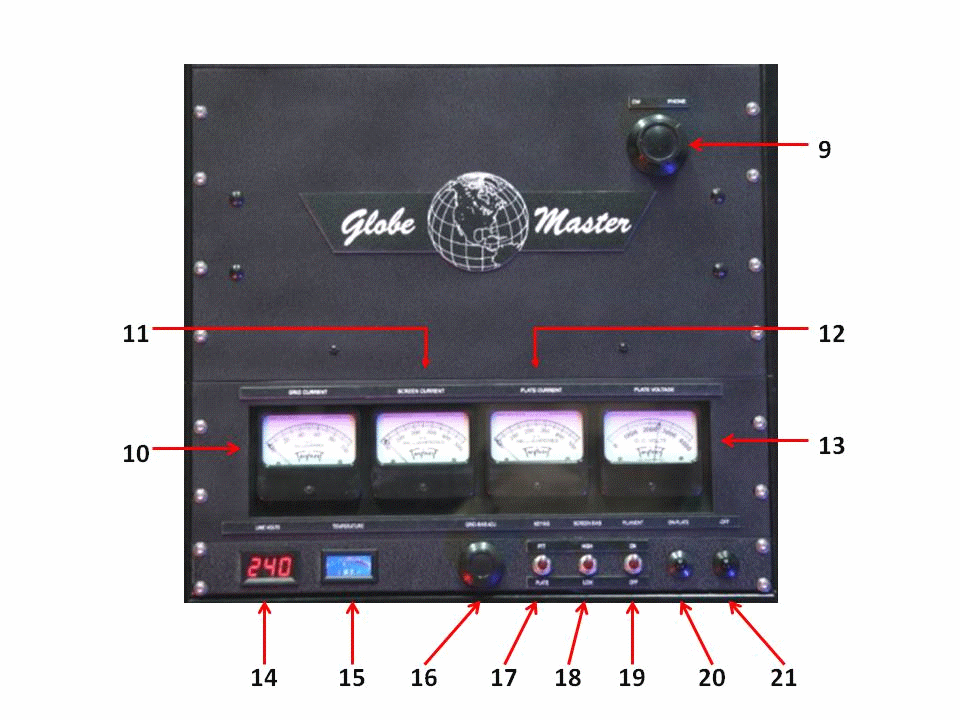
(10) GRID CURRENT Measures RF amplifier 4-1000A grid current. Normal is about 25mA in AM mode.
(11) SCREEN CURRENT Measures RF amplifier 4-1000A screen grid current. Normal is about 100mA in AM mode.
(12) PLATE CURRENT Measures RF amplifier 4-1000A plate current.
(13) PLATE VOLTAGE Measures RF amplifier 4-1000A plate voltage.
(14) LINE VOLTAGE Measures AC line input voltage. Ideal is 240 volts +/- 2.5%
(15) TEMPERATURE Measures 4-1000A ambient air cabinet temperature in degrees Fahrenheit.
(16) GRID BIAS Allows for proper 4-1000A grid bias adjustment for SSB operation. Turn fully CCW for AM Exciter drive.
(17) KEYING When in PTT mode (grid-block keying), the modulator, RF power amplifier, REC MUTE jack (item 50), EXCITER KEY jack (item 51) and antenna T/R relay are remote controlled via KEY PTT jack (item 49), located on rear panel. When in PLATE mode, all items described above are keyed when PLATE ON (item 20) is depressed after a one second time delay.
(18) SCREEN BIAS When in HIGH position (normal), maximum screen voltage is delivered from the screen supply to the 4-1000A screen grid. LOW position reduces the screen voltage and cuts the amplifier’s output power approximately in half. It is suggested to use the LOW position for tune-up.
(19) FILAMENT Enables the 4-1000A filament and negative grid bias supply.
(20) PLATE-ON Enables 4-1000A plate and screen supplies. Also keys devices in item 17, depending on position of KEYING switch.
(21) PLATE-OFF Trips 4-1000A plate and screen supplies and drops KEYING relays.
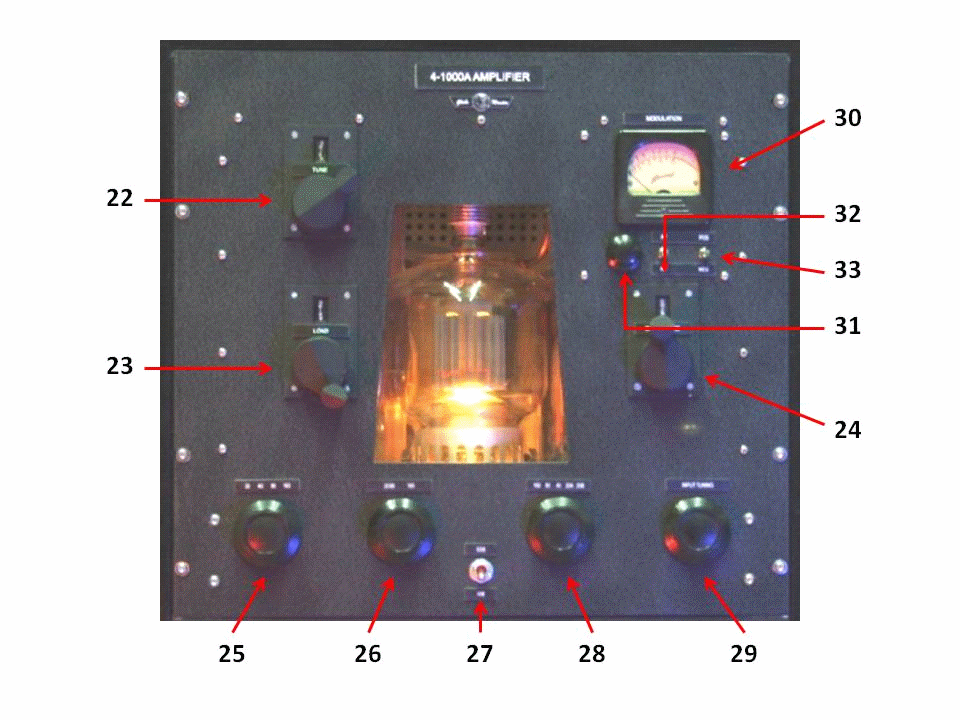
(22) TUNE Plate tuning vacuum variable capacitor.
(23) LOAD Load tuning vacuum variable capacitor.
(24) INDUCTANCE Inductance (L1a) roller inductor.
(25) 20/40/80/160 Output inductor (L3) band selector switch.
(26) 20/80-160 Output Inductance (L1b) band selector switch.
(27) SSB / AM Screen grid inductance selector switch. Places a 15 Henry choke in series with screen supply circuit when switch is placed in AM mode. WARNING: DO NOT PLACE IN SSB POSITION WHEN 304TL MODULATOR IS IN SERVICE! IMMEDIATE ARCING AND POSSIBLE DAMAGE TO EQUIPMENT MAY RESULT WHEN AUDIO IS IMPRESSED ONTO MODULATION TRANSFORMER. This switch should only be placed in the SSB position when the RF deck is being used as a stand-alone SSB Linear Amplifier or Low Level AM Amplifier. The 304TL modulator should be switched off and CW-PHONE selector switch placed in the CW position.
(28) 160/80/40/20a/20b Input band selector switch.
(29) INPUT TUNING Tune for maximum drive from exciter. (25mA nominal on grid)
(30) MODULATION METER Measures percent modulation, positive and negative or average RF power depending on switch 32 and 33 setting.
(31) CALIBRATE Allows calibration of the modulation meter to full scale when switch 32 is in the RF position.
(32) AF / RF Indicates percent modulation when in the AF position. RF position is for calibration of the modulation meter.
(33) POS / NEG When switch 32 is in the AF position, POS indicates POSITIVE modulation. When in the NEG position, NEGATIVE modulation is indicated on the meter.
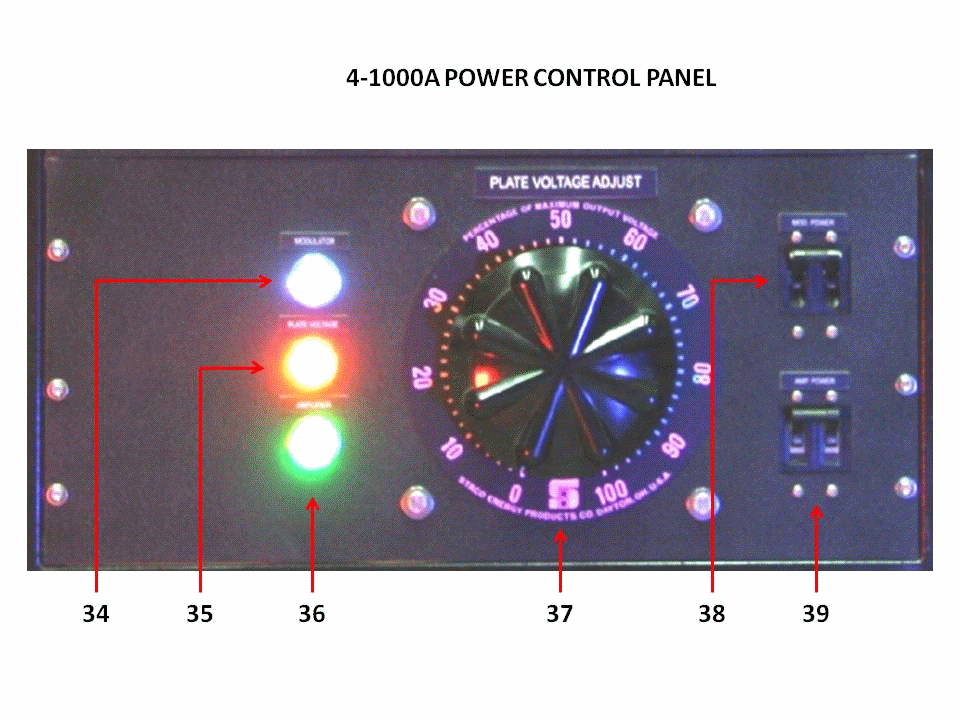
(34) MODULATOR Indicates AC power to the 304TL Modulator.
(35) PLATE VOLTAGE Indicates plate voltage is present in the 4-1000A RF deck.
(36) AMPLIFIER Indicates AC power to the 4-1000A RF deck.
(37) PLATE VOLTAGE ADJUST Allows adjustment of the 4-1000A plate voltage.
(38) MOD POWER Main AC circuit breaker for 304TL modulator.
(39) AMP POWER Main AC circuit breaker for 4-1000A RF deck.
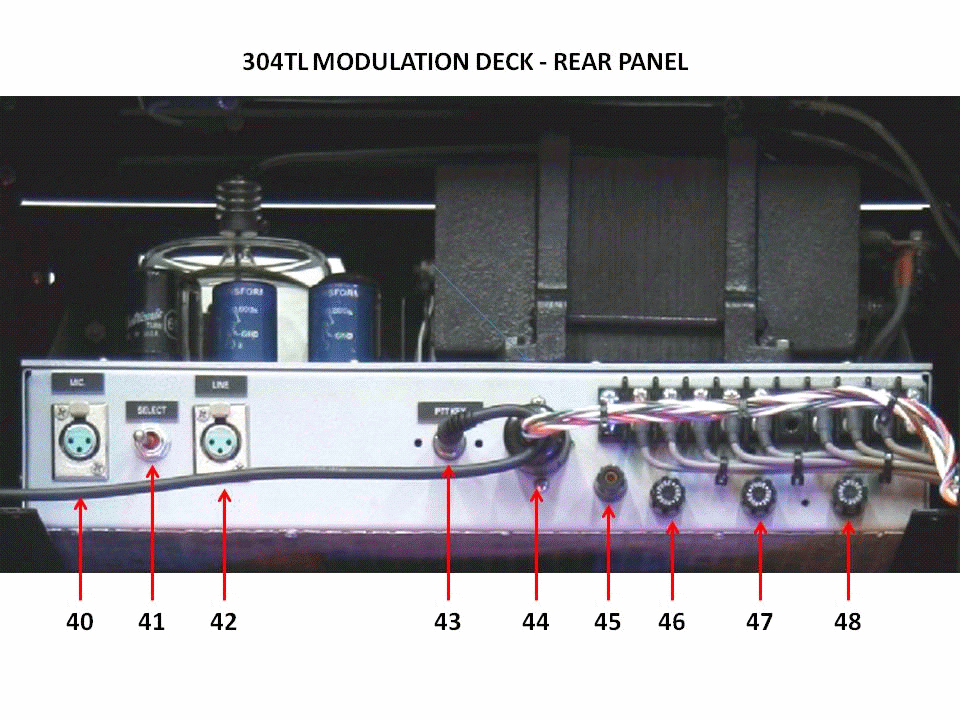
(40) MIC Dynamic microphone input, Lo-Z, 600 ohms
(41) SELECT Toggles audio input between MIC and LINE XLR input jacks.
(42) LINE Line level input XLR jack, 600 ohms, balanced.
(43) PTT KEY Modulator PTT jack. Enables 304TL bias grid current when keyed.
(44) DC INPUT Filament, Low Voltage DC, Grid Bias power supply connector plug.
(45) GROUND
(46) FUSE 5A
(47) FUSE 3A
(48) FUSE 15A
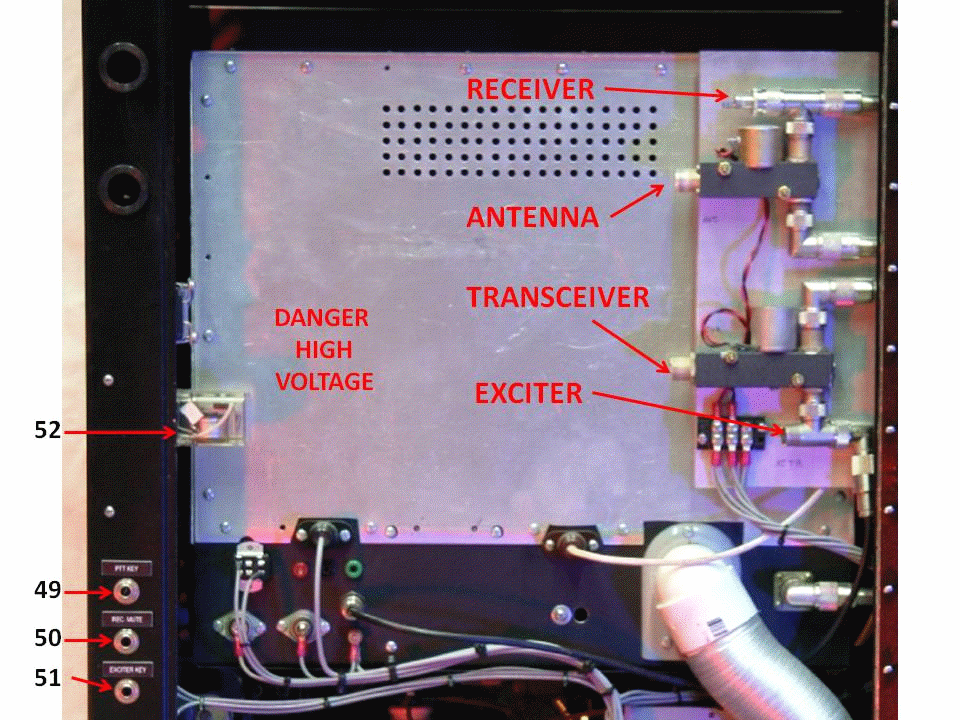
(49) PTT KEY External PTT key. Keys transmitter when grounded.
(50) REC MUTE Mutes receive when transmitter is keyed.
(51) EXCITER KEY Keys exciter when transmitter is keyed.
(52) PTT RELAY
TUBE COMPLEMENT
MODULATOR TRANSMITTER
6SJ7-mic preamp 4-1000A-RF Deck
6SN7-phase splitter
6SN7-pre driver
5881/6L6GT-driver (2ea)
304TL-output (2ea)
TRANSMITTER POWER REQUIREMENTS
240 VOLTS AC, 3-WIRE SINGLE PHASE PLUS GROUND, 20 AMPS, 60 HERTZ. LINE VOLTAGE: +/- 2.5%
SECTION THREE
POWER SUPPLIES AND PROTECTION CIRCUITS
GENERAL
For convenience of operation the 304TL modulator and 4-1000A amplifier have been designed with completely independent high and low voltage power supplies. In most transmitters of this type it is generally acceptable to operate the RF final and the modulator off of the same supply. There are several advantages in separating the power supplies:
304TL modulator fixed supply allows “set and forget” bias adjustment.
304TL modulator may be completely turned off and bypassed allowing the RF amplifier to be used as a stand-alone low level AM amplifier or SSB linear amplifier.
4-1000A RF deck’s plate voltage can be adjusted for desired output power independently from the modulator.
BRIEF DESCRIPTION OF EACH POWER SUPPLY
The 304TL modulator power has three DC power supplies and two filament supplies:
3kVDC / 0.5A choke input full wave rectified high voltage supply.
330VDC choke input low voltage plate supply for the preamp and driver amp sections.
-300VDC negative adjustable bias supply with grid-block-keyed for biasing the 304TL finals.
5VAC / 60A rated 304TL filaments transformer, inrush current protected.
6.3VAC supplies voltage to the preamp and driver tube filaments.
The 4-1000A RF Amplifier has three DC power supplies and one filament supply:
2.5 to 4kV, 700mA rated adjustable DC high voltage supply featuring inrush and fault current limiting with over-current protection.
Dual voltage screen grid power supply for low and high power operation; low power usually used for “tune-up” if uncertain of load conditions.
-200VDC negative adjustable bias supply, grid-block-keyed for 4-1000A “cut-off” when not transmitting, (i.e. receive mode).
7.5VAC / 22A inrush protected 4-1000A filament transformer.
DESIRED GOALS
It seems every person has their own preferences when it comes to building power supplies, or anything else for that matter, particularly when it comes to protection circuits, component sizes, etc. Many items may factor into the final product such as choices of “available” components, cabinet size, proposed layout, budget, and so on. That said, there probably really is no real “best” way or method so long as you do the best you can, it works and works well.
By comparison, commercial transmitters of similar power and quality of the Globe Master use very large and bulky cabinets and components. This is because unexpected commercial “down time” could get very expensive in a real hurry, and, if you can’t easily get to and work on the suspect “bad” components, you might be down for a long time.
The Globe Master was designed to be much smaller in size compared to its commercial counterpart, be relatively easy to maneuver around the shack, pack a big punch and be reasonably easy to perform maintenance on. The Globe Master has a lot of “stuff” in a small package; but only the absolute minimum “must have” items were commissioned for service (due to space constraints) No bells and whistles here, just the necessities. Only the highest quality components available to the builder at the time of construction were used. No shortcuts were taken and no quality was compromised. All circuits were thoroughly tested and carefully evaluated before moving on to the next circuit. The aforementioned practices helped ensure not only a smoother road to success, but also a reliable transmitter that would (hopefully) provide years of enjoyment to the owner.
4-1000A POWER SUPPLY
THEORY OF OPERATION
The
author has chosen to go the route of a “well filtered” design in
building the Globe Master. That doesn’t necessary mean “well
regulated”. This was going to be an AM transmitter, so, from an AC
symmetrical point of view, the total components of an AC RF signal
should always equal zero, which in turn would theoretically make the
load constant thus resulting in a relatively constant DC voltage to the
load.
It was therefore chosen to use choke input design on the DC plate
supply. Other factors in the design were the availability of
components. For instance, when just the “right size” plate transformer
was found, it was physically too big to fit into the permitted space. A
3KVA, 7200VCT secondary, 240VAC secondary transformer was readily
available and did fit the space requirement. Unfortunately the DC
output voltage would be much higher than needed; nearly 4800VDC, so it
was decided to use an input choke (a converted microwave oven
transformer was used for this purpose).
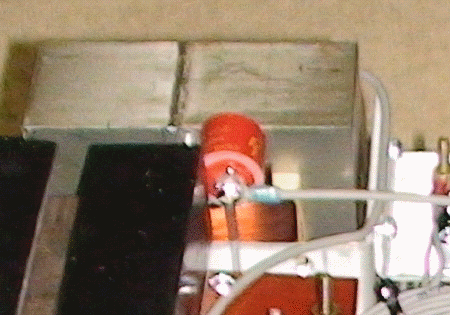
The choke was set-up to reduce the full load voltage by around 1200 volts, or 3600 B+ volts output at full load. This was accomplished by carefully tuning the input choke by using a small high voltage capacitor on the input terminal of the choke. The choke needed to be about 12 Henries or so, be able to withstand the available high voltage to ground and needed to fit into a small 4” x 4” x 5” space.
LOW VOLTAGE START-UP AND RELAY SEQUENCING
SCHEMATIC DIAGRAM
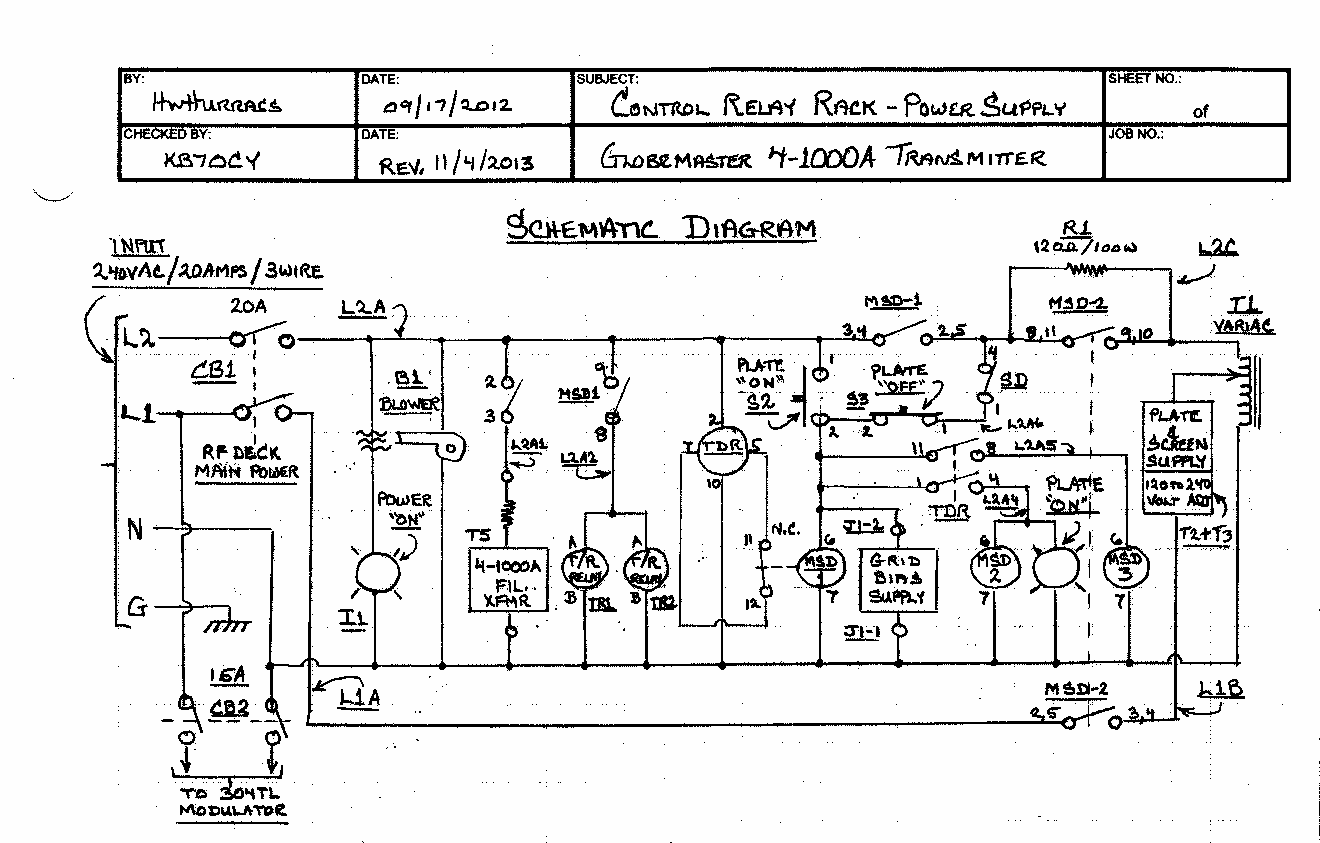
When the main AMP POWER circuit breaker CB1 is enabled, the AMPLIFIER indicator lamp, RF amplifier blower fan B1 are energized and the plate time delay relay TDR is armed. Placing the FILAMENTswitch (S1) to the ON position energizes the 4-1000A filament transformer and the negative grid bias power supply.
It was assumed that a dual primary 240 volt center tapped, 7.5 volt secondary filament transformer had been installed in the RF deck. It was discovered that a 10 volt, 22 amp filament transformer had inadvertently been installed instead. The 4-1000A requires a filament voltage of 7.5VAC to operate properly. This was actually a blessing in disguise. I found that placing a 20 ohm, 20 watt resistor in series with the filament transformer not only gave me the correct voltage, but also reduced the inrush current to the filament by just over the operating current. Heavy inrush current can greatly reduce the life of the tube, so two problems were solved with one solution. The extra heat generated by the resistor turned out to be a good trade-off.
The PLATE-ON / PLATE-OFF (S2 and S3) are of standard “start-stop” latching relay design enabling the addition of the plate over-current tripping scheme.
When the PLATE-ON pushbutton is pressed, relay MSD1 is picked up which in turn keys the parallel DOW KEY antenna relays, energizes the plate transformer “pre-charging” resistor R1, and enables time delay relay TDR. After an approximate one second time delay, the main plate power relay MSD2 and PLATE ONindicator light is energized. The plate circuit is now fully energized.
4-1000A VARIABLE OUTPUT POWER
DC PLATE AND SCREEN SUPPLY
A 120 volt / 22 ampere Variac is employed for adjustment of both the PLATE and SCREEN power supplies simultaneously. The Variac is tapped from the center point of a three-wire 240 VAC service and requires a solid NEUTRAL connection for proper operation. The idea behind this particular design is that one can use a much larger current capacity Variac, which starts out on the low end at half the maximum available plate voltage and can be increased to its maximum value without the need for a physically larger 240 volt Variac to do the same job. I don’t know of anybody who starts a transmitter at “zero output power” and goes up from there. A 240 volt Variac is MUCH BIGGER AND HEAVIER than its equal current-rated 120 volt counterpart. In this application, it’s kind of like having a variable tap-changer on your plate transformer! …Low, Medium and High Power (and anything in between), at the twist of a dial. This result is that the no-load DC output voltage may be adjusted from approximately 2400 to 4800 volts allowing for quite a range of output power(s).
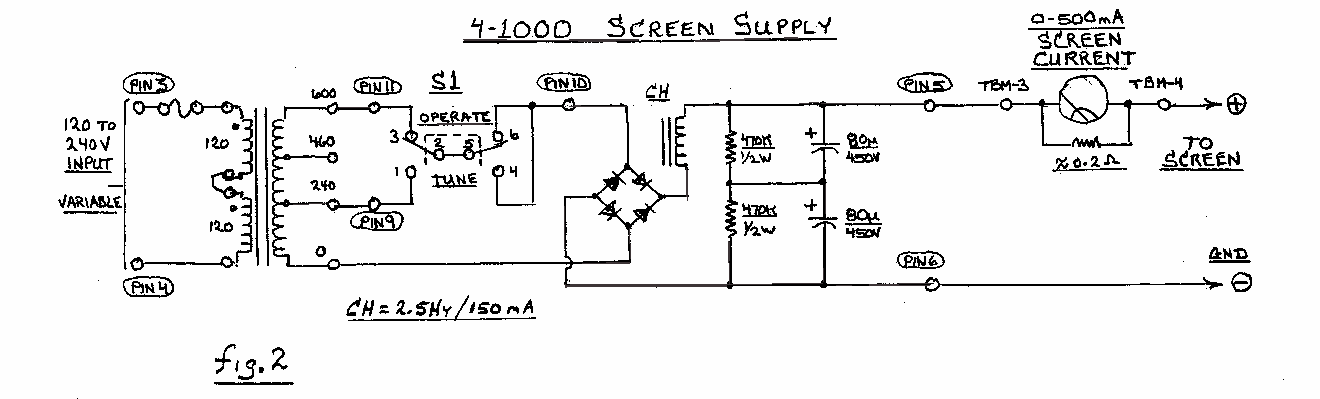
As mentioned earlier, the SCREEN power supply is connected in parallel with the PLATE TRANSFORMER input. Maximum input voltage to both PLATE and SCREEN transformers is 240 VAC. The secondary of the screen transformer has two taps: a 120 volt and a 480 volt tap. These two taps are brought to the front panel’s SCREEN BIAS – HI/LO switch. The amplifier is normally operated with the SCREEN BIAS switch in the HI position and delivers screen bias voltages between about 300 and 600 volts, depending on position of the POWER CONTROL VARIAC. The LO position may be used like a “TUNE” switch, as the transmitters output power is substantially reduced due to the lower voltage being delivered to the screen.
4-1000A
PLATE TRANSFORMER HIGH VOLTAGE RECTIFIERS,
FILTERING AND CURRENT LIMITING
HV SUPPLY COMPONENT REAR VIEW
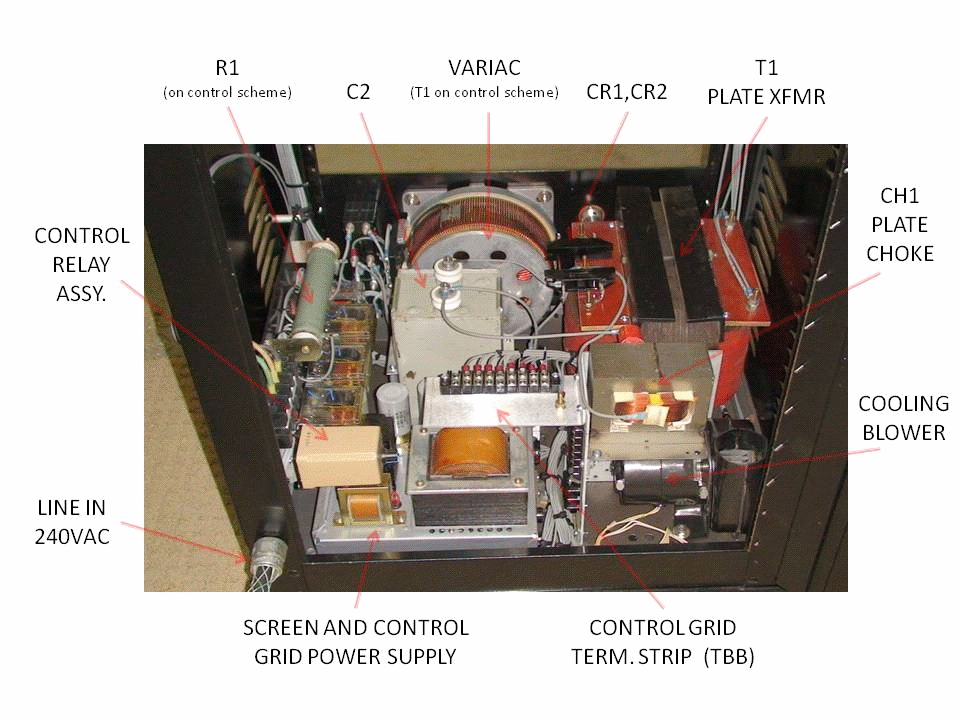
HV SUPPLY COMPONENT FRONT VIEW
as a Republican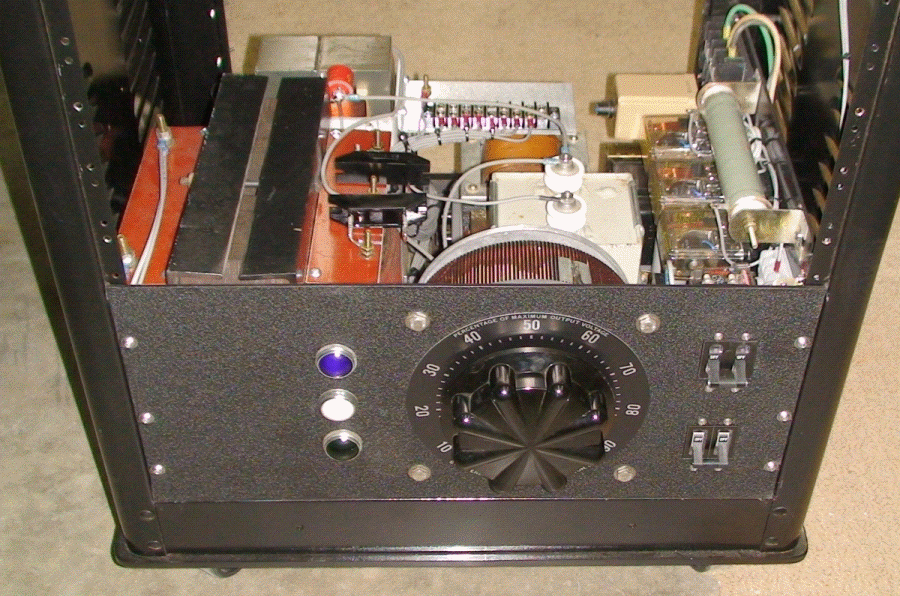
SCHEMATIC DIAGRAM
HIGH VOLTAGE PLATE SUPPLY
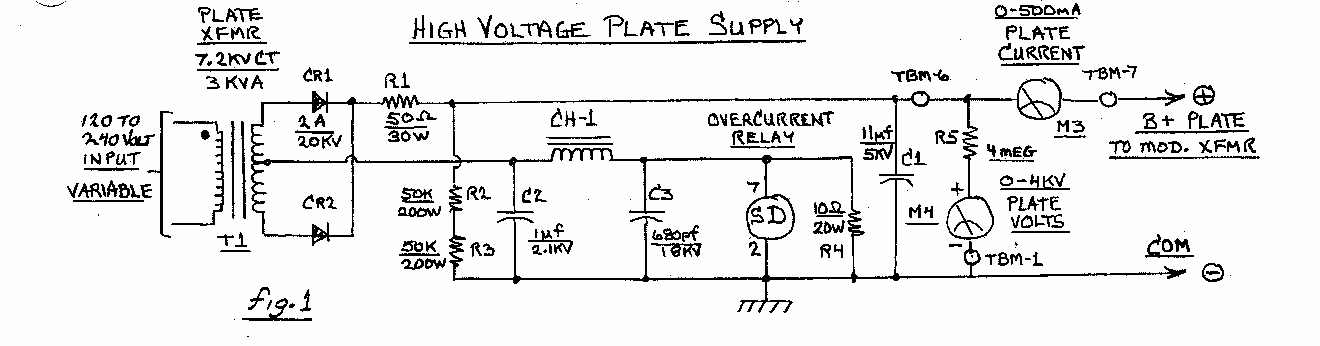
SCHEMATIC DIAGRAM
SCREEN GRID POWER SUPPLY
To
keep the size down, the main power transformer uses two 2 amp, 20kV
solid state rectifiers in a full wave configuration. The center tap, or
B- of the plate transformer, is fed into a home-brew “input choke”
which is series connected to ground via an over-current relay. The B+
side is fed into a 50 ohm, 20 watt wire-wound current limiting resistor
which is terminated into a 11uf, 5kV oil filled capacitor. This
current limiting resistor aids in reducing the maximum fault current
from a couple thousand amps to approximately 60 amps at 3kv plate.
Should a fault occur, severe damage is mitigated even further by use of
an over-current relay. The over-current relay is an ice cube type relay
with a 12VDC coil. The relay reliably picks up between 7.0 and 7.1
volts. To establish a 700mA pick-up, a 10 ohm, 20 watt wire wound shunt
resistor was placed in parallel across the over-current relay’s 12 VDC
coil. When the over-current relay picks up, the primary plate
start-stop circuit is interrupted and the main plate power source relay
trips.
At full load, the power supply will deliver over 3600 volts B+ @ 500mA. The input choke is a modified microwave oven transformer converted and “fine tuned” for a 1200 volt drop (at 500mA) by placing a 2uf / 2.1kV oil capacitor of the same type used in microwave ovens from the “hot” leg of the modified choke to ground. I tried various capacitor values from 1uf to 4uf and the 2uf seemed to give the results I was looking for. A detailed description of how the microwave oven transformer (MOT) was re-worked into a choke is at the end of this article.
Additional regulation is provided by two large 50k / 200 watt bleeder resistors connected in series located at the top of the transmitter. The configuration used here works well as it provides good filtering, protection and the necessary voltage drop without any unnecessary heat.
4-1000A CONTROL GRID BIAS SUPPLY
SCHEMATIC DIAGRAM
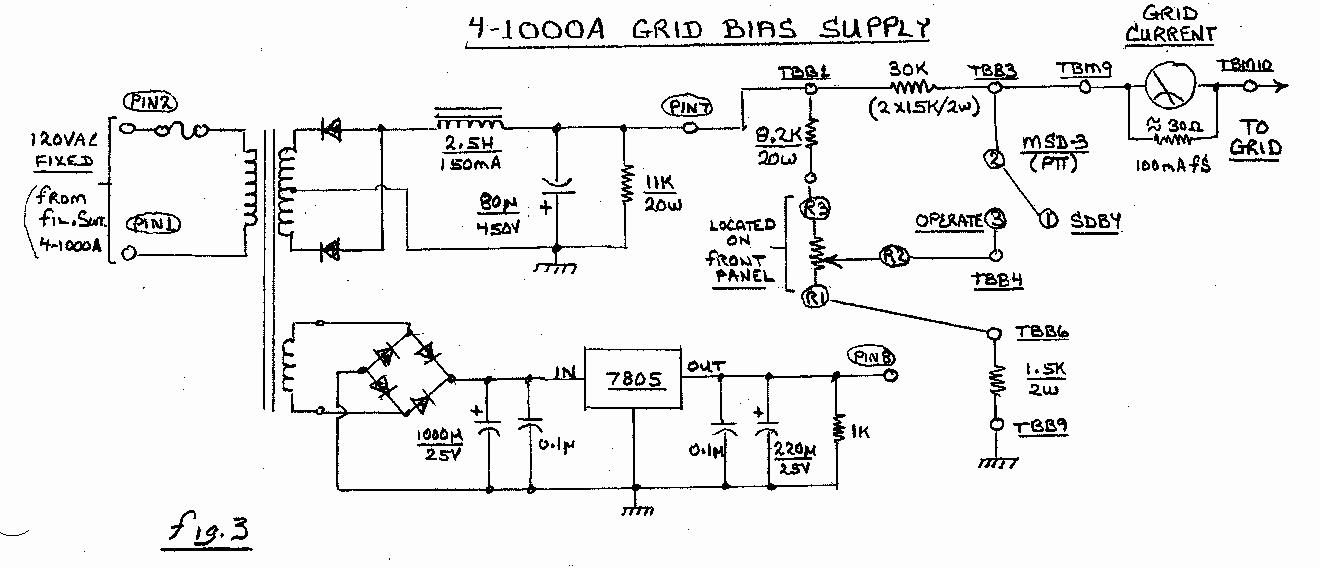
It was decided early on that the amplifier might like to be used not only for HIGH LEVEL AM operation, but perhaps be driven by a LOW LEVEL AM EXCITER or SINGLE SIDBAND TRANSMITER as well, so a switchable bias combination for these options would be needed. It was suggested that a method called GRID-BLOCK KEYING be used to accomplish this.
Initially the transmitter was keyed up by enabling the PLATE-ON push button which would key the ANTENNA RELAY and after a second or two time delay, energize the plate transformer and an auxiliary relay contact would un-block the grid of the 304TL modulator.
This design proved to be lame at best:
When you keyed up, you had to remember to also key the exciter, mute the receiver or you’d get a tremendous audio feedback, all the while your arms would flail in all directions pushing buttons, twisting knobs, etc. Without fail you inevitable got the “sequence of operation” out of order.
I decided to rewired a front panel switch for two “KEY MODE” types: PLATE MODE and PTT MODE
When in PLATE MODE and the PLATE-ON push button is depressed, the entire transmitter is keyed after a two second time delay. This is a little rough on the HV PLATE SUPPLY as the high voltage is constantly being switched on and off between transmissions. Probably a great setting if you like BROADCASTING.
When in PTT MODE, the HV supplies are always energized, so no power transformer surging occurs, rather a combination of auxiliary relay contacts are picked-up to perform the following actions:
Automatically keys the EXCITER, MODULATOR, ANTENNA RELAY, and MUTES THE RECEIVE (through either NO/NC contacts). ¼ inch mic jacks are used for the KEY EXCITER, MUTE RECEIVE and PTT TRANSMITTER functions. They are conveniently located on the rear lower left side of the transmitter.
I found the latter method of keying to be superior over the previous one.
Actual grid bias is determined by the position of the GRID BIAS CONTROL on the RF DECK CONTROL PANEL and the TYPE OF OPERATION (AM, SSB). The 4-1000A grid always has a negative voltage present when unkeyed.
SECTION FOUR
GLOBE MASTER 4-1000A RF DECK
RF DECK TOP VIEW
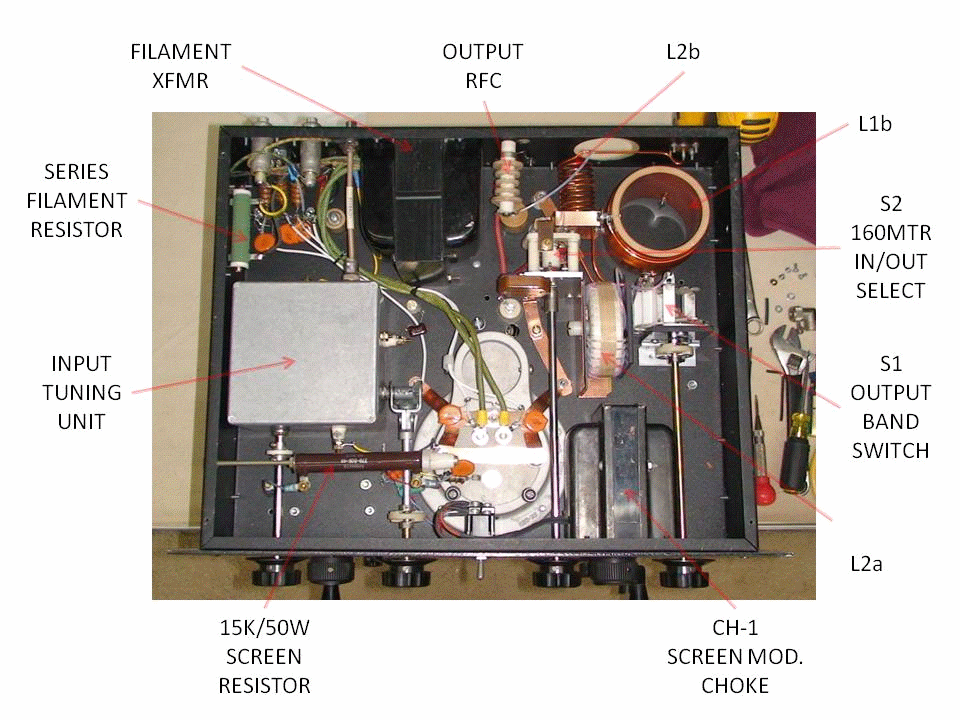
RF DECK BOTTOM VIEW
RF DECK
SCHEMATIC DIAGRAM
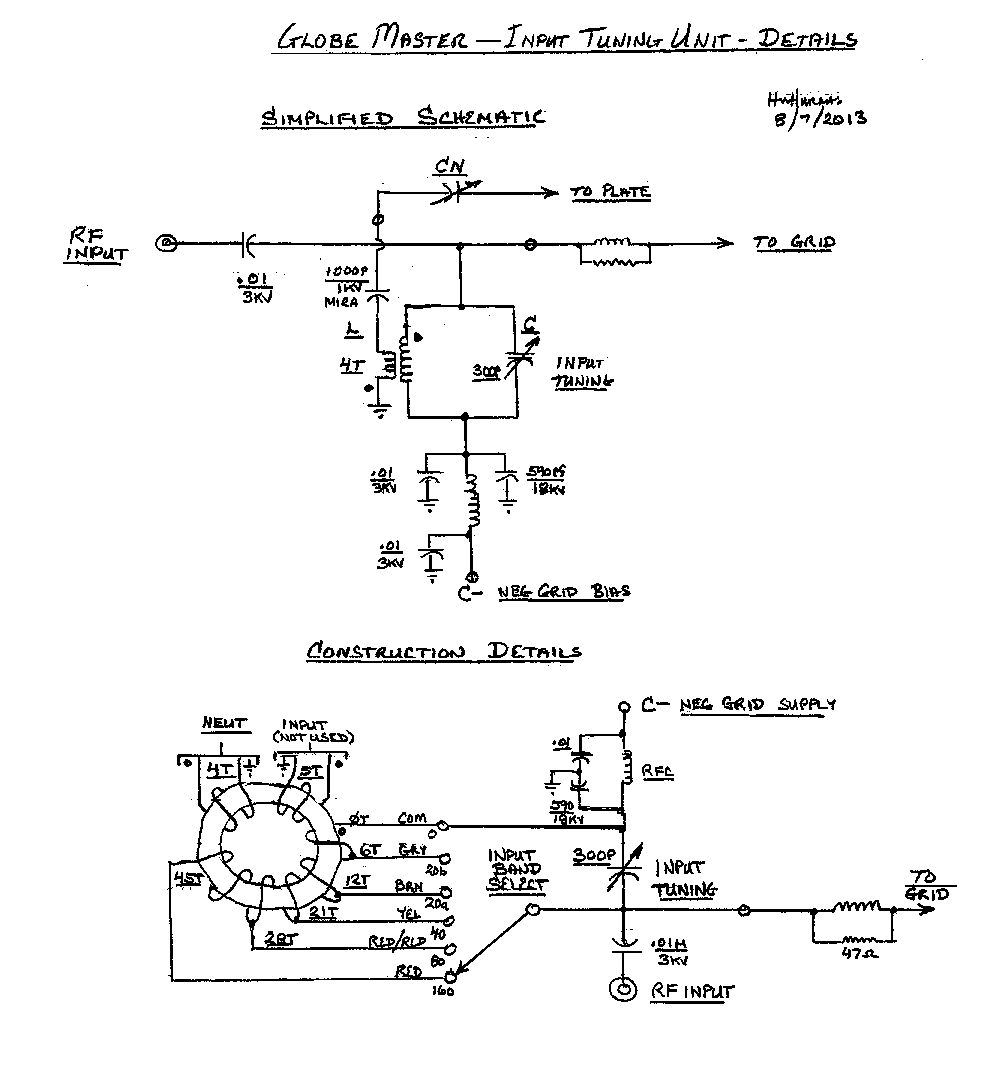
INPUT TUNING UNIT
SCHEMATIC AND WIRING DIAGRAM
CIRCUIT DESCRIPTIONS
CONTROL GRID INPUT CIRCUIT
RF from the exciter is connected to the RF INPUT jack of the amplifier via connection to either the EXCITER INPUT or TRANSCEIVER INPUT SO239 connectors located in the inside back door section of the lower cabinet. The 4-1000A is grid driven through a band-switchable tuning unit and requires a drive signal of only 12 watts or so to deliver full power to the load.
The INPUT TUNING UNIT serves both as a parallel-tuned input band trap and a negative feedback neutralization transformer in addition to the control grid bias voltage source. Input coil (L) is tapped and switched at various points as indicated in the TUNING UNIT WIRING DIAGRAM. Variable input tuning capacitor (C) allows wide band tuning on and past any band selected by the INPUT BAND SELECTOR switch. The tuning unit was not originally built by the author, only modifications to the present configuration were made to accommodate neutralizing and input tuning; therefore the composition of core material (L) is unknown. Same holds true for output coil (L2a), so don’t ask what they are, because I don’t know.
Some attempted configurations to the input tuning unit were link-coupling; which failed miserably when driven by a “solid state” rig-SWR problems. Too much drive was required when driven by a 6146 X 2 rig. Also attempted <for supposable amplifier stability>was grid swamping resistors. This just added more load to the exciter causing the exciter to run hot plus I was unable to get full output due to now “lack of drive power”.
I could not find a real solution for neutralization, as split-variable-tuning capacitors are very difficult to find these days; and the tuning unit had already been built. Being worried about the real problem of amplifier instability and parasitic “thermo-nuclear” runaway… (Metzler’s Law: “Every Amplifier Wants to be an Oscillator”), I was unsure on how to prevent building a GIANT OSCILLATOR in the first place.
It just
so happened I was reviewing some schematics in the back of the RCA TT5
tube manual when I stumbled across something very interesting in the
grounded-grid 811A amplifier project. I noticed a tertiary winding on
the input tuning coil going to the neutralizing capacitor and tied to
the plate circuit of the 811A’s. The tertiary winding was connected so
that the signal returning from the plate was 180 degrees out of phase
with the input signal. This “enlightenment” was absolutely ingenious!
No split-capacitor needed! I would envision this circuit to perform
similarly to what the AUDIO PHOOLS call “NEGATIVE FEEDBACK”.
I thought it would work something like this: I would properly neutralize the amplifier on 40 meters and as the operating frequency went up the additional coupling of the neutralizing capacitor (CN) would add more and more negative feedback to the input stage. This would automatically produce a “rolling-off” of the higher frequencies. Hopefully well before the “parasitic range” was reached, there would actually be less than unity gain of the amplifier and oscillation could not occur. I hope I’m right here, but so far it has worked very well. Only drawback I see is that as the operating frequency is increased, more drive power would be needed for the same output. However, with the very low power needed to drive the amplifier to full output, this has not been an issue.
SCREEN GRID CIRCUIT
The screen grid voltage is a direct function of the position of the plate voltage OUTPUT CONTROL Variac, as the primaries of the plate and screen transformers are both connected in parallel. Therefore, as the plate voltage is increased, the screen voltage increases as well.
There are normally two methods used to develop screen bias. One is to use bias dropping resistors using the plate voltage as the source and the other is using a separate fixed bias supply. There are pros and cons to both.
Screen Dropping Resistors:
Pros:
If a plate voltage malfunction occurs (loss of plate voltage), screen voltage would disappear as well thus preventing damage to the tube caused by excessive screen current.
Screen voltage would follow the plate voltage; excellent for AM.
Cons:
Lots of heat burned-up in the screen resistors! For example, assuming plate voltage of 3kV, maintaining 500V @ 100ma on the screen grid would cause the dropping resistors to produce 250W of heat.
Fixed Screen Supply:
Pros:
Provides a stable voltage source at relatively low power consumption. Poor for high level AM reproduction unless special issues are addressed. (I’ll talk about this a bit later)
Cons:
Current limiting fuses or other special circuitry must be provided to protect the screen grid in the event of loss of plate voltage. Low impedance path to ground must be provided to the screen grid at all times.
Due to the excessive amount of heat produced by dropping resistors, I chose to use a separate fixed bias supply with a low impedance path to ground.
William Orr, K6SAI, describes numerous times in his Radio Amateur Handbook, that the screen MUST NEVER BE ALLOWED TO BE DISCONNECTED FROM IT’S LOW IMPEDANCE SOURCE, EVEN FOR A SPLIT SECOND, AS THE SCREEN VOLTAGE WOULD INSTANTLY EXCEED IT’S RATING AND THE TUBE WOULD BE DESTROYED. THE TIME IT TAKES FOR A TOGGLE SWITCH TO TRANSITION FROM ONE STATE TO ANOTHER IS TOO LONG!
This problem was addressed by the permanent addition of a 15K/50W screen protection resistor connected from screen to ground. This provides the low impedance path to ground, AND, by connecting the screen and plate supplies to the same power source, both supplies SHOULD shut down or be energized at the same time.
A toggle switch on the front panel allows the secondary of the screen transformer to be switched from the HIGH to LOW power setting. This reduces the screen voltage approximately in half for tuning purposes.
THE SCREEN MODULATION CHOKE
During
initial testing the RF deck performed reasonably well. Great SSB and
Low Level AM reports. Things changed considerably when we tried to
use the 304TL Plate Modulator. Audio levels in excess of 30% would
cause arcing in the RF deck and on the modulation transformers’
protective spark gap. We knew that there some
impedance mismatch between the modulator and the PA , but
not that much. We
decided to add small 2.5H/150mA choke in series with the 4-1000A
screen grid, which reduced the arcing somewhat.
The WRL Globe King 500 series transmitter, for example, uses a choke
in series with the screen, but only in the AM mode. I read or heard
somewhere that when the screen choke method of modulation is
employed, the value of the choke should be somewhere in the 10~20
Henry range.
We were able to obtain a large 15H/200mA choke and swapped it out with the 2.5H/150mA one. Wow! What a difference! Some arcing does occasionally occur when the modulation level is well in excess of 100%, but not very often. There has been much local discussion as to exactly why the screen choke is needed in the high level modulation mode, some of which concluded that the high-wattage screen dropping resistor method allows the screen grid to “swing in phase with the plate current”. The screen choke does something similar, but some audio phase distortion is expected to be encountered. One thing we do know for sure is that hi level modulation doesn’t work well without one or the other. A bypass switch labeled MODE AM/SSB was added to the front panel of the RF deck so that the screen choke may be bypassed when using the RF deck as a stand-alone amplifier.
Pi-L TANK NETWORK
The RF deck utilizes a Pi-L tuning network consisting of Plate Tuning Capacitor C2, Primary Tuning Inductance L1, L1a and L1b, Output Loading Capacitor C3, and Output Inductors L2a and L2b. The Pi-L network provides excellent second harmonic suppression. Values were chosen from the Pi-L chart in the William Orr, W6SAI, Radio Handbook.
C2 (PLATE TUNING) is a 400pf vacuum variable capacitor.
L1 is the 20 meter coil.
L1a (INDUCTANCE) is a 40uH roller inductor.
L1b adds an additional 17uH of inductance to L1a in order to cover the 160 meter band which is controlled by switch S2. Switch S2 also adds 500pf to the loading tuning capacitor (C3) in the 160 meter mode.
C3 (LOAD TUNING) is a 1500pf vacuum variable capacitor.
L2a is the output “L” part of the Pi-network and is band switched via control S1. I am not sure of the origin of this coil other than I was told that it is “commercially available for just this purpose”. It seems to work very well.
L2b is the 20 meter portion of L2a, see schematic for additional details.
RFC at the RF output connector provides for a DC reference.
SECTION FIVE
GLOBE MASTER 304TL MODULATOR
DESCRIPTION
The Globemaster 304TL modulator consists of the following stages:
Balanced microphone and line XLR audio input connectors, switchable on back panel.
6SJ7 microphone preamp
6SN7 first stage audio amplifier and phase splitter
6SN7 second audio stage driver
6L6G / 5881 third stage audio driver
304TL class AB1 audio output to 1.33 to 1 impedance ratio custom modulation transformer (rated 2.2KVA)
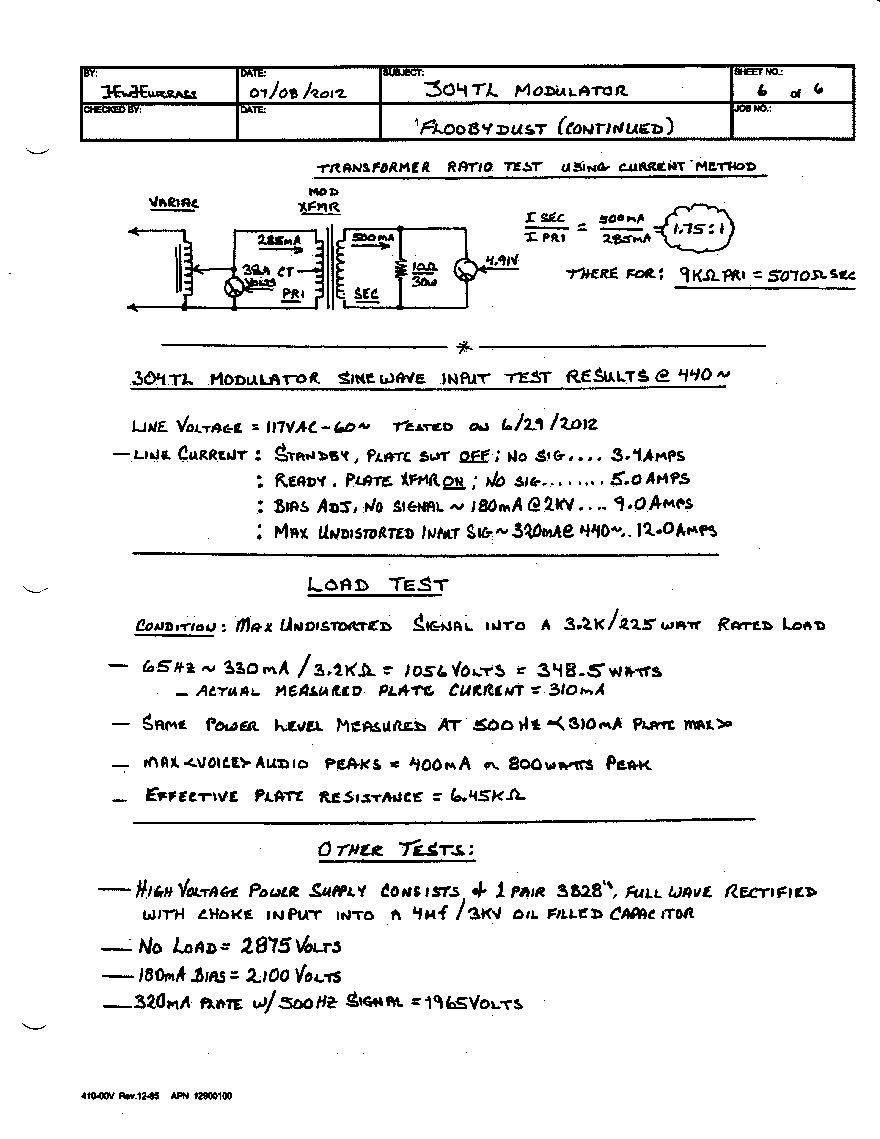
The high voltage power supply consists of a choke input, full wave rectifier (one pair 3B28’s) 3Kv (no load) 2.2Kv@500mA (measured) mounted on a steel plate below the modulation transformer.
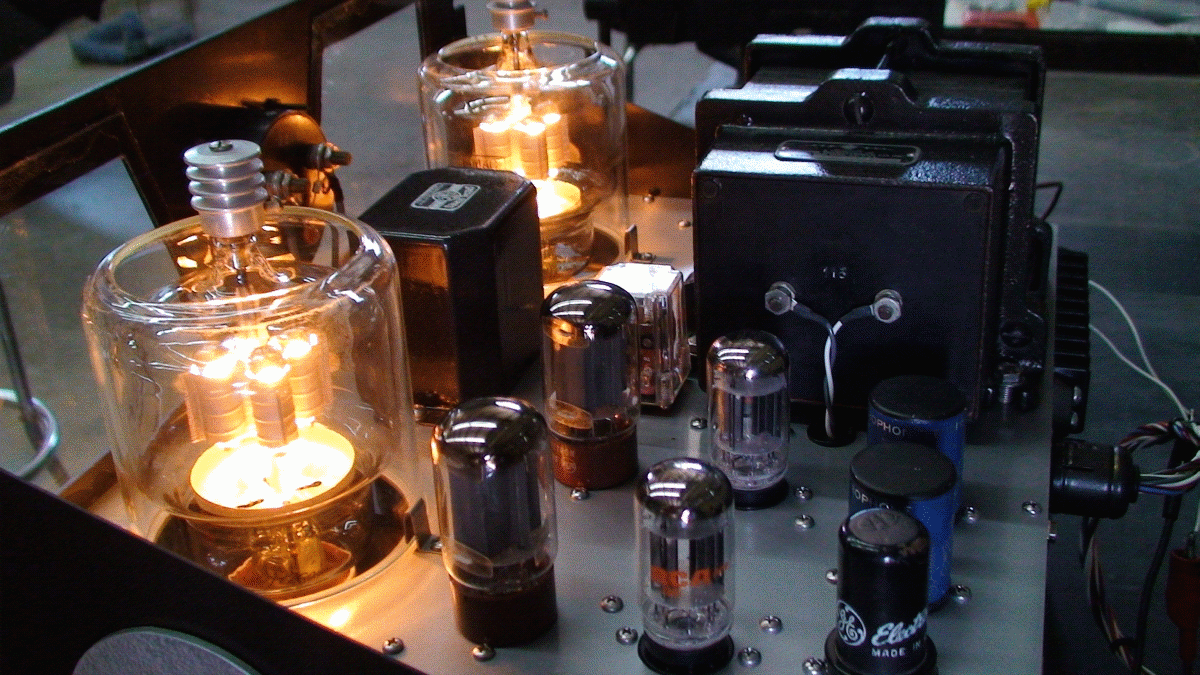
MODULATOR TOP VIEW

MODULATOR BOTTOM VIEW
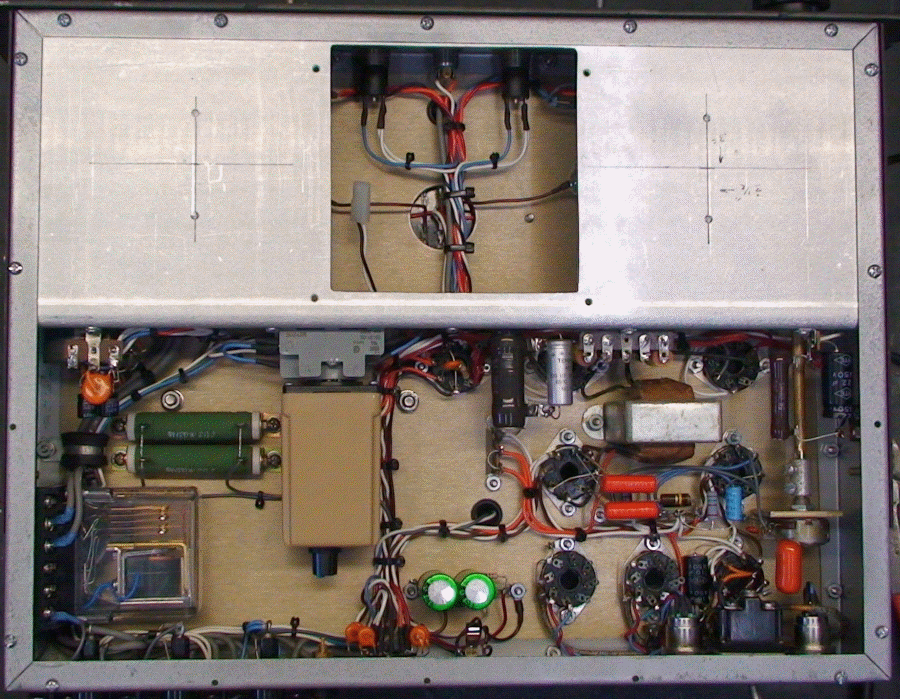
MODULATOR COMPONENTS LAYOUT
SCHEMATICS AND WIRING DIAGRAMS
SECTION SIX
TUNING PROCEEDURE
HIGH LEVEL AM MODE
PRESET THE FOLLOWING CONTROLS
MODULATOR DECK
1 BIAS ADJUST FULLY COUNTER-CLOCKWISE
2 FILAMENT OFF
6 PLATE OFF
8 BIAS ADJUST FULLY COUNTER-CLOCKWISE
9 CW/PHONE PLACE TO PHONE POSITION
CONTROL PANEL
16 RF GRID BIAS FULLY COUNTER-CLOCKWISE
17 KEYING PTT
18 SCREEN BIAS HIGH
19 4-1000A FIL. OFF
MAIN POWER PANEL
37 PLATE VOLTAGE ADJUST-FULLY COUNTER-CLOCKWISE
38 CB2 (MODULATOR)-OFF
39 CB1 (MAIN POWER)-OFF
4-1000A RF DECK
27 SSB/AM AM
31 MOD MON FULLY COUNTER-CLOCKWISE
AFTER THE ABOVE PROCEEDURE HAS BEEN COMPLETED, REFER TO THE BAND TUNING CHART
FOR THE FOLLOWING:
28 INPUT BAND SLECECTOR SWITCH: PLACE ON DESIRED BAND
29 OUTPUT BAND SELECTOR SWITCH (L3): PLACE ON DESIRED BAND
26 OUTPUT –L SELECTOR SWITCH (L1b): PLACE ON 160M ONLY IF (L3) IS ALSO ON 160M
ALL OTHER BANDS PLACE (L1b) ON 80/20M
22 PLATE TUNE: REFER TO TUNING CHART
23 LOAD TUNE: REFER TO TUNING CHART
24 INDUCTANCE TUNE: REFER TO TUNING CHART
NOTE* The tuning chart settings were set for a plate load resistance of 3300 ohms and an output load resistance of 50 ohms. The actual operating plate load may vary quite a bit depending on Variac setting (Plate Voltage Adjust) and plate current. Plate load resistance of 8000 ohms may not be uncommon. Using this chart will bring you into the “ballpark”, so to speak. So use the chart as a preliminary set point and “fine tune” from there.
ONCE THE ABOVE STEPS ARE COMPLETE, YOU WILL BE READY TO
ENERGIZE THE TRANSMITTER
ENERGIZING THE TRANSMITTER
BEFOR YOU CONTINUE, IT IS ASSUMED THAT YOU HAVE A SUITABLE LOAD OR DUMMY LOAD CONNECTED TO THE TRANSMITTER’S ANTENNA CONNECTOR, A PTT SWITCH IS CONNECTED TO THE PTT KEY JACK <49> AND A SUITABLE EXCITER TUNED TO THE CORRECT OPERATING FREQUENCY IS CONNECTED TO EITHER THE “TRANSMITTER IN” OR “EXCITER IN” JACKS. IT IS ALSO ASSUMED THAT THE EXCITER WILL BE KEYED BY THE “KEY EXCITER” <51> OUTPUT JACK. A LOW-Z MICROPHONE SHOULD BE PLUGGED INTO THE MIC-IN XLR PLUG LOCATED ON THE BACK OF THE MODULATION DECK AND THE MIC/LINE SWITCH PLACED IN THE MIC POSITION.
STEP 1 ENERGIZE THE MAIN POWER CIRCUIT BREAKER <39>(CB1) LOCATED ON THE LOWER RIGHT HAND SIDE OF THE TRANSMITTER POWER PANEL. YOU SHOULD HEAR THE RF DECK BLOWER TURN ON AND THE GREEN INDICATOR LAMP <36>SHOULD BE LIT.
STEP 2 ENERGIZE THE MODULATOR POWER CIRCUIT BREAKER <38>(CB1) LOCATED ON THE LOWER RIGHT HAND SIDE OF THE TRANSMITTER POWER PANEL. THE BLUE INDICATOR LAMP <34> SHOULD BE LIT.
STEP 3 PLACE THE 4-1000A FILAMENT SWITCH <19> FROM “OFF” TO “ON”. THE 4-1000A SHOULD LIGHT.
STEP 4 PLACE THE MODULATOR FILAMENT SWITCH <2> FROM “OFF” TO “ON”. THE 304TL’s SHOULD LIGHT. AFTER A SHORT TIME DELAY, THE “READY” INDICATOR <3> SHOULD LIGHT.
STEP 5 ENERGIZE THE RF DECK PLATE BY PUSHING THE “PLATE-ON” <20> BUTTON ON THE CONTROL PANEL. THE ORANGE “PLATE VOLTAGE” LAMP <35> SHOULD LIGHT AND VOLTAGE SHOULD BE INDICATED ON THE “PLATE VOLTAGE” <13> METER. THE VOLTAGE SHOULD BE AROUND 2400 VOLTS.
STEP 6 INCREASE THE PLATE VOLTAGE VARIAC <37> TO THE DESIRED PLATE VOLTAGE.
STEP 7 PLACE “PLATE” SWITCH <6> ON MODULATOR TO “ON”. “PLATE ON” LAMP <5> SHOULD LIGHT.
STEP 8 PRESS THE “PUSH-BIAS ADJUST” <4> AND SLOWLY TURN THE “BIAS ADJUST” KNOB <1> IN THE CLOCKWISE DIRECTION AND ADJUST BIAS UNTIL A READING OF ABOUT 140mA IS INDICATED ON MODULATION PLATE CURRENT METER <7>, THEN RELIESE THE “PUSH-BIAS ADJUST” BUTTON.
STEP 9 TURN THE EXCITER OUTPUT POWER TO A VERY LOW LEVEL AND PRESS THE PTT KEY. WARNING: THE TRANSMITTER IS NOW KEYED UP!
STEP 10 SLOWLY ROCK THE “INPUT TUNING” KNOB <29> BACK AND FOURTH UNTIL SOME PLATE CURRENT IS SEEN ON THE PLATE CURRENT METER <12>. ADJUST FOR PEAK READING. INPUT TUNING IS NOW COMPLETE.
STEP 11 FINE TUNE ADJUST THE “PLATE TUNE” <22>, “INDUCTANCE” <24>, AND THE “LOAD TUNE” <23> CONTROLS FOR A DIP IN PLATE CURRENT AND MAXIMUM OUTPUT POWER, AS YOU WOULD WITH ANY OTHER RF POWER AMPLIFIER.
STEP 12 NEXT GRADUALY INCREASE THE EXCITER OUTPUT DRIVE UNTIL THE GRID CURRENT METER <10> READS ABOUT 25mA. *CAUTION* DO NOT EXCEED 30mA OF GRID CURRENT! DAMAGE TO THE 4-1000A COULD OCCUR. SCREEN CURRENT SHOULD BE ABOUT 100mA. RE-TUNE OR “FINE TUNE” THE TRANSMITTER PLATE, INDUCTANCE AND LOAD CONTROLS AS NEEDED.
STEP 13 SPEAK INTO THE MICROPHONE AT A NORMAL LEVEL AND ADJUST THE “AUDIO GAIN” <8> CONTROL TO ACHIEVE 100% MODULATION ON YOUR MODULATION MONITOR OR SCOPE ON PEAKS. *WARNING* DO NOT EXCEED 310mA ON THE MODULATION CURRENT METER OR SERIOUS DISTORTION, FLAT-TOPPING AND ARCING WILL OCCUR! IF ARCING OCCURS WELL BELOW 100% MODULATION, RF AMPLIFIER TO MODULATOR IMPEDANCE MISMATCH IS PROBABLY OCCURRING. RAISING THE RF PLATE VOLTAGE, WHICH ALSO INCREASES THE OUTPUT POWER MAY HELP, BUT BE AWARE THAT YOU WILL NEED TO TOUCH UP THE TUNING. IF ARCING DURING MODULATION STILL OCURRS, CHECK TO SEE IF THE SSB/AM SELECTOR SWITCH WAS INADVERTENTLY LEFT IN THE SSB POSITION.
OPERATING THE GLOBEMASTER IN LOW LEVEL AM MODE
(USING THE GLOBEMASTER’S RF DECK AS A STAND-ALONE
LINEAR AMPLIFIER)
FOLLOW ALL THE ABOVE STEPS EXCEPT: (WE WILL ASSUME THE GLOBMASTER WAS JUST
OPERATED IN THE HIGH-LEVEL AM MODE FOR THE FOLLOWING STEPS)
STEP 1 TRANSMITTER IS UN-KEYED
STEP 2 ON THE CONTROL PANEL, PUSH THE “PLATE-OFF” PUSH BUTTON <21> PLATE VOLTAGE SHOULD DROP TO ZERO.
STEP 3 PLACE THE “PLATE” SWITCH <6> ON THE MODULATOR FROM “ON” TO “OFF” POSITION.
STEP 4 PLACE THE “FILAMENT” <1> SWITCH ON THE MODULATOR FROM “ON” TO “OFF” POSITION.
STEP 5 PLACE THE MODULATION POWER CIRCUIT BREAKER <38> LOCATED ON THE LOWER RIGHT SIDE OF THE TRANSMITTER FROM “ON” to “OFF”.
STEP 6 PLACE THE “CW/PHONE” SWITCH <9> FROM THE “PHONE” POSITION TO THE “CW” POSITION. THIS BYPASSES THE MODULATION TRANSFORMER.
STEP 7 ON THE RF DECK, PLACE THE “AM/SSB” SWITCH FROM THE “AM” TO THE “SSB” POSITION. THIS SHORTS OUT THE 4-1000A SCREEN CHOKE.
STEP 8 FOLLOW THE STEPS AS OUTLINED IN THE ABOVE “ENERGIZING THE TRANSMITTER” SECTION FOR TUNING UP AND OPERATING THE AMPLIFIER.
OPERATING THE GLOBEMASTER IN SSB MODE (USING THE
GLOBEMASTER’S RF DECK AS A STAND-ALONE LINEAR
AMPLIFIER)
FOLLOW ALL THE STEPS AS OUTLINED IN THE “OPERATING THE GLOBEMASTER IN THE
LOW-LEVEL AM MODE” AS OUTLINED ABOVE, INCLUDING TUNE UP AND OPERATION, AS
THERE IS NO CARRIER IN THE SSB MODE UNTIL AUDIO IS PRESENT.
STEP 1 AFTER TUNE-UP, SWITCH THE EXCITER FROM THE AM MODE TO THE SSB MODE.
STEP 2 KEY THE TRANSMITTER (PTT) AND, WITH NO MODULATION PRESENT, ADJUST THE 4-1000A’s GRID BIAS CONTROL <16> (LOCATED ON THE CONTROL PANEL) UNTIL APPROXIMATLY 100mA OF PLATE CURRENT IS INDICATED ON THE PLATE METER. THE AMPLIFIER WILL NOW PERFORM AS A CLASS AB2 LINEAR AMPLIFIER. YOU SHOULD RECEIVE EXCELLENT SIGNAL REPORTS! WATCH YOUR EXCITER DRIVE! BE CAREFULL NOT TO EXCEED THE MAXIMUM 25mA GRID and 100mA SCREEN CURRENT LEVELS ON PEAKS!
GLOBEMASTER TUNING CHART
SECTION SEVEN
BUILDING YOUR OWN PLATE CHOKE USING A MICROWAVE OVEN TRANSFORMER!
Finding a choke that would be of high enough inductance, be able to withstand a high potential and handle the required current, yet fit into a small place, turned out to be a nearly impossible task…at least until I began examining the standard microwave oven transformer. There are literally millions of them out there, and when plucked from a “dead” microwave oven, could be had free! Perfect!
The AC output of a standard microwave oven is about 2100 volts from terminal to case ground (the “cold” end of the primary is usually connected to the core of the transformer with a lug and pop rivet). The current ratings appear to be around the 750mA range as well.
In order to use the microwave oven transformer as a smoothing choke, the center tap of the plate transformer would be connected to the “hot” terminal of the microwave oven transformer and the case would be grounded. But before any of this could happen, the microwave oven transformer would need to be “converted” or “modified” from a transformer to a choke and set-up to have the proper inductance desired. Below is detailed information on this subject.
CONVERTING A MICROWAVE OVEN TRANSFORMER TO A CHOKE
MEASURING THE INDUCTANCE
Using a CDE942 series capacitor rated at 1.0uf / 2kv (or any reasonable capacitor of known value) in series with a microwave oven transformer and a 1000 ohm resistor, this series LCR circuit was connected to an audio generator capable of about 20 volts P-P output. Measuring across the resistor with an oscilloscope one would vary the frequency until a peak voltage would appear on the scope. Now you have two known values: the value of the test capacitor and the frequency. By use of the simple formula where (L=C) at resonance, one can determine the value of L quite readily.
I have found that most microwave oven transformers are somewhere around the 33 to 35 Henry range. The microwave oven transformer would need to be modified if it were to be used as a choke as 30+ henries is too much inductance for practical use. A value of 6 to 12 henries is more realistic.
MODIFYING THE MICROWAVE OVEN TRANSFORMER
If you examine a microwave oven transformer, you will probably notice that most are manufactured with an “E / I” type of lamination construction and the “E” is welded to the “I”. (FIGURE 1). What I did was grind just enough of the weld away on both sides so I could split the two laminations apart (FIGURE 2). FIGURE 3 shows how much material ideally should be removed to split the two halves apart; just enough to split the core. FIGURE 4 shows the split core. Note the “magnetic shunts” located just above the winding. These are designed so as the microwave oven transformer becomes “overloaded”, the current does not exceed rated value under normal conditions. With the shunts still in place, I measured about 6 Henries on my test choke; so I left them intact. They may be removed if less inductance is desired.
Also note the primary (120 volt) winding and the magnetron filament winding was carefully chiseled and removed as they would not be needed. Be careful when you do this as to not damage the fine secondary winding.
Now take a beer coaster, or other suitable “stiff” type of insulating material, and place it between the “E” and the “I’ laminations (FIGURE 5) and put some pressure on the two halves (FIGURE 6) Once this is done, the inductance may be measured and pressure readjusted until the inductance is where you want it. The inductance will change depending on how much insulation is used between the two halves and somewhat how much pressure is placed between them. As a rule of thumb: the more insulation, the less the inductance. More than 1/16 of an inch of insulation is not recommended. Pressure placed on the gapped sections will also aid in reducing an audible “buzz”, which bay occur if the laminations are left “loose”. Beer coasters seem to have a good consistency by maintaining decent “tightness”.
Refer to FIGURE 7. Once the correct inductance is acquired, the two halves may be sewn back together by either using a MIG (wire-feed) welder, or, if that is not available, by simply squeezing together using long bolts. I do not recommend using a TIG welder, as this seems to just “blow-away” the thin lamination core material. The residual material is then ground to a smooth finish as in FIGURE 8. The finished transformer choke is shown in FIGURE 9.
On FIGURE 10, I carefully drilled out the pop rivet and lifted the winding’s “cold” end lug and used a small door knob capacitor as an insulating binding post. This isolates the winding from case ground which allows the cold end to be connected to the plate over-current relay circuit. If you don’t do this, the over-current circuit won’t work.
Before welding the two halves together, the inductance was measured 11.7 henries. The inductance increased to 13.0 henries afterwards; a little bit high but still within reason for my application. You may wish to account for this change by going maybe 10 percent low on the inductance measurement before welding the core back together.
Another useful application of a “converted microwave oven transformer” may be as a high inductance screen supply choke. This would make for great sounding AM audio and has the advantage of greatly reduced heating that would normally occur by using current limiting resistors of a comparable value. This is due to the audio signal being converted to a magnetic field then back into useful energy and, unlike a large screen dropping resistor, there is no heat; something to think about.
FIGURE 1
TYPICAL E-I CORE CONSTRUCTION
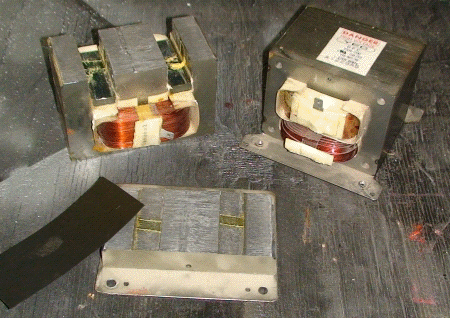
FIGURE 2
GRINDING THE TWO CORE HALVES APART

FIGURE 3
AMOUNT OF MATERIAL REMOVED
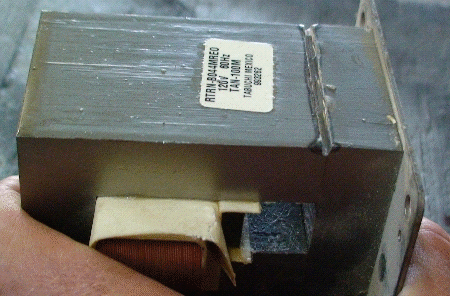
FIGURE 4
SPLIT CORE
NOTE
PRIMARY AND FILAMENT WINDING REMOVED AND
LOCATION OF MAGNETIC SHUNTS ON EITHER SIDE OF GAP
FIGURE 5
PLACEMENT OF INDUCTANCE BARRIER (BEER COASTER)
FIGURE 6
COMPRESSING THE BEER COASTER BARRIER BETWEEN THE E AND I CORE
FIGURE 7
WELDING THE CORE BACK TOGETHER
FIGURE 8
CLEANING UP THE WELD
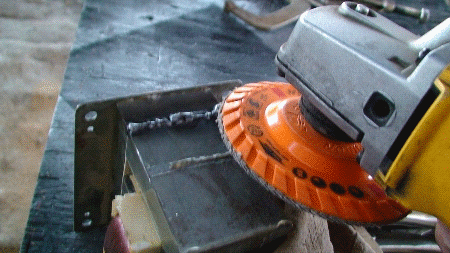
FIGURE 9
FINAL PRODUCT-12 HENRY CHOKE
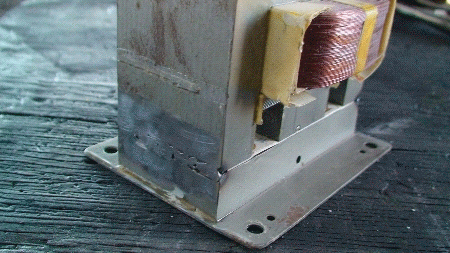
FIGURE 10
NOTE
RED DOOR KNOB CAPACITOR (STAND-OFF INSULATOR)
MOUNTED TO TRANSFORMER CORE
SECTION EIGHT
ACKNOWLEDGEMENTS
I would like to express my sincere gratitude to the hams and friends who provided me guidance and encouragement. This is my first home brew AM transmitter build, so I figured I might as well go big. A lot of experimenting was done and a lot was learned. Every section was thoroughly rebuilt or modified and tested before proceeding to the next phase of the project. The transmitter took about nine months to build.
Kind regards, KB7OCY Henry Hurrass
W7GNP, Jim Wortham, for providing me with the 1950’s home brew “parts” transmitter that I used for this project. The original intent was to refurbish the old transmitter, but it was too far gone.
KE7TRP, Clark Turner, for his patient mentoring on the 304TL audio stages, bias settings and the like. These are things you just can’t seem to find in the handbooks.
K7EWE, Jim Wiggins, for the brand new old stock 304TL’s sockets, encouragement and friendship!
K6SAI, William Orr (SK), author RADIO HANDBOOK, a fantastic source for reference material; in particular, the PI-L network and High Power RF Tetrode theory.
The 1950 ARRL HANDBOOK. Reference and Schematics used for the Class AB1 Modulator and associated audio circuits; also the Modulation Monitor schematic.
SECTION NINE
ADDITIONAL INFORMATION
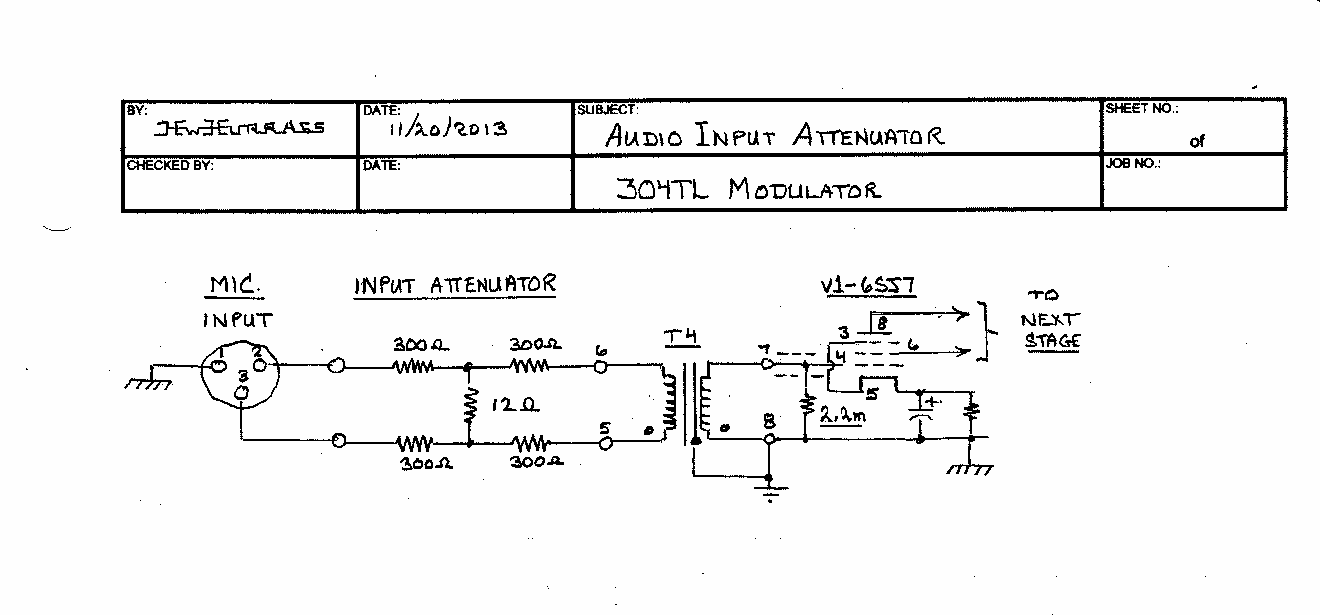
AUDIO INPUT ATTENUATION ADDED TO THE 304TL MODULATOR
I may have gone a bit overboard with the overall gain of the 304TL modulator’s driver stages as just barely cracking the AUDIO GAIN control would drill the 304TL’s to full output. In an effort to reduce the gain, an attenuator consisting of four 300 ohm and a 12 ohm attenuator resistor was placed ahead of the microphone balance-to-unbalance transformer. The circuit is a 600 ohm input to 600 ohm output balanced design which provides about 40 db or so of attenuation. The resistors were soldered directly to the microphone transformer’s tube socket in an effort to keep the leads as short as possible. The schematic below shows the mod. The same circuit was used on the LINE IN microphone transformer tube socket.
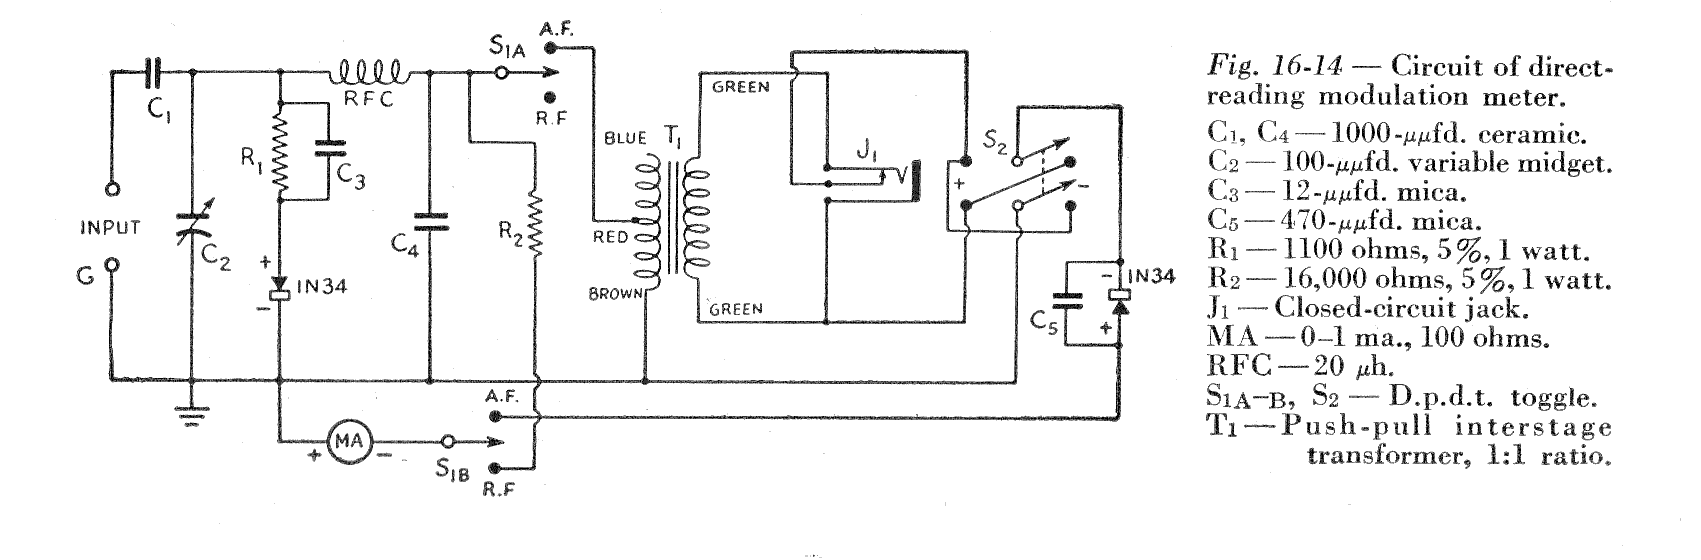
MODULATION MONITOR
A modulation monitor meter was added to the upper right corner of the RF deck. Details for this meter can be found in the 1950 ARRL Handbook, Page 476. The meter was built in a fully enclosed 4 x 4 aluminum case and has a BNC connector on the back side for connecting the RF pick-up probe located in proximity to L1a. For courtesy I’ve included a copy of the schematic below.
DIGITAL METERS
Although not “Era Correct”, the two digital meters on the front panel provide these important features:
LINE INPUT VOLTAGE. Measures AC line voltage. Self powered. Proper line voltage is 240VAC plus/minus 2.5%.
TEMPERATURE METER. Measures the ambient air temperature just above the RF deck. Provides indication that the cooling fan is in working order. Operates on 5VDC from a filament winding source on the RF GRID bias transformer. After a long QSO the temperature will reach 117F with an ambient of about 90F.
I purchased these meters on ebay directly from China for about $6 to$7 a piece, including shipping. The voltmeter needed to be taken apart and the internal calibration trim pot adjusted. I bought several “spares” and all read a little low. I think they may have been calibrated for 50 Hertz and the American Standard is 60 Hertz. Once calibrated, they’re spot on.